Pages

Thursday, 19 January 2012

The Dream Couch

I sort of failed my no-shopping January because I bought a couch. But it was pretty! And cheap! And second hand! And came with two chairs and a table! And it's my dream couch! Also our old one wasn't in a good condition and we had been discussing getting a new one and once my other half agreed (after I had mercilessly pestered him about it for weeks) that an antique sofa might be nice, I went ahead and got us one. 

Once I got the permission to buy some kind of an antique sofa, I checked Huuto.net, the local equivalent of Ebay. There was one sofa that looked very nice and was located close by. I was just going to phone the seller and ask how much it would cost to get the furniture delivered to our apartment, but he was very willing to sell and the sofa was in our living room by the end of the day :) The whole set cost me 400 euros including delivery, which was a very good price considering a new sofa would have cost at least 300 euros (and it would have been uglier).

I'm super happy with it! It's beautiful, comfy and in a good condition, nothing broken and only one small stain on one of the chairs. It's not very old, since it has modern cushions and the fabric hasn't worn out. I was planning on painting the wooden parts black, but my other half likes it this way so no paint for this baby! Luckily I have another couch that I can work on if I run out of things to do... ;)

Now some pictures!

The sofa and a kitty, the ugly blue thing is the corner of the old sofa

Closeup of the arm rests (and my lovely pillows)

The chairs that came with it

The coffee table. It's not the same shade of wood so it isn't from the same set, but still is very nice

I'm not sure if I'll keep the table, there was no picture of it on the ad so I just hoped it would be nice. I was hoping for one with four legs so I could have installed a shelf beneath the table between the legs to have some space for all the stuff we have in the living room. It's still very pretty and I'll try if I get used to it! The table needed some TLC, I put four screws on the bottom of the top part to make it more steady and re-glued one of the legs because it was a bit wobbly. Now it's good and steady. I still think it would look better painted black, but I'd probably paint everything black if allowed ;)


I was worried if our kitties would scratch the fabric, but they didn't seem that interested in it. The old sofa is horribly customized by cats, but it had been scratched when my other half got it and it was impossible to keep our kitties from doing the same when they noticed it was already marked by some other cat. Luckily it seems to be related to only the one piece of furniture and they mostly only scratch their scratching posts. They mainly wanted to lounge on the new sofa.

Happy users on the sofa

Another happy sofa user

It fits three cats!

Tuesday, 17 January 2012

How To Goth Up A Chair

I needed a new chair for my vanity and since I like crafts and didn't want to settle for anything ordinary, I came up with an idea to customize an old chair to fit my taste better. This is the result:

My lovely chair!

Here are the instructions for how you can make a lovely gothic chair, too.

You need:
A wooden chair
Fabric, as much as the chair originally has (and fabric dye if you want to customize it)
Ribbon, as much as the chair originally has
Sandpaper, 120 grit
Painter's tape
A small foam paint roller
A small paintbrush
Paint
Staple gun and staples
Hot glue gun or some other glue suitable for fabric and wood


Step 1, the chair:
Find a chair with a nice shape to start with. Anything wooden will do, and chairs with small cushions have less work.

I purchased a second hand chair with a nice rose carving and lovely curvy legs.I paid 70 euros for it, including shipping. It was all intact, so I decided to just add my new fabric on top of the old one and paint the wooden parts without taking the old fabric off. If the fabric would have been torn or worn out close to breaking, I would have taken the old fabric off. It's held in place with small nails.

The chair before
Step 2, sanding:
Take off the decorative ribbon covering the edges of the old fabric if there's any (save it or measure it so you can buy new ribbon) and sand the wooden parts. I used 120 grit sandpaper and just quickly went over the wood to break the surface of the varnish. This helps the paint to stick better. You can poke at the tricky parts (the small indents in the rose or other decorations) with folded sandpaper, but I wasn't too concerned about not sanding all the crevices since they hardly get any wear when the chair is used.

Step 3, painting:
Use painters tape to shield areas you don't want to have paint on them. Someone with more patience might have taken off the whole cushion, but since I'd rather go for the easy and fast alternative, I just used tape and it worked fine.

Then paint! I chose a black paint with satin finish (which was already lying in my closet) and painted it on with a small foam roller. The parts that I couldn't reach with the roller I painted with a large watercolour brush, but a stiffer brush would have been better. The brush leaves a shinier surface, but I just sprayed some matte varnish on those parts after the paint was dry and they looked fine.

I used a paint that can be thinned with water, so it didn't stink and I could paint indoors and wash my tools easily. You need a few coats to get darker colours even.

Painting in progress

Neatly placed painters tape

I just taped the edges because the part behind the cushion won't show.

Step 4, fabric:
The fabric. Measure the cushion(s) of your chair and buy fabric and the decorative ribbon if your chair has any. I took the ribbon with me to the store to make sure I'll get one with similar width so it can cover the nails and staples I will use to fasten the fabric.

Or do it like me, go to the fabric store and think everything is too boring and dye your own fabric! I wanted something ornamental or black and white stripes or something purple. I found a discount upholstery purple in a really nice shade and paid around 5 euros for it. I also bought black paint-on fabric dye for 6 euros.

I wanted striped because they were easy to make and looked nice, so I just masked parts of the fabric with tape. I would recommend painters tape, but since I had already spent all of mine on the painting part of the job, I used electrical tape. It worked ok, but since electric tape stretches a bit it pulled my fabric and made the painting harder. So remember to buy extra painters tape! 

I didn't measure the stripes, but for a good result you should, or you could coat the entire fabric piece with tape and then take out every other tape to produce the pattern. Mine didn't come out completely even, but I can live with that.


Fabric with tape to mask the stripes

I used the same small foam paint roller to paint the dye, it worked really well. I did two or three coats, it was easy to tell if the purple still showed though. Dark colours are easier than light ones, because on light fabric it really shows if you make a mistake.

Fabric with dye painted on it
I let the dye dry overnight like the instructions on the bottle said and ironed it to fasten it.


Ironing the fabric is important, usually I'm too lazy to do it

Finished fabric. You can see the stripes are not even, but who cares? ;)

Step 5, covering the old cushion:
Put the fabric right side down on the chair and mark any corners with pins and then sew them. Don't worry about the extra fabric, just make sure you have enough to cover the cushion.

A folded, sewed corner
Next I cut off some of the extra fabric just so I can better see what I'm doing and used a staple gun to fasten it to the chair. If you have the old fabric still beneath, like I did, watch out for the nails that keep it in place. You'll get curly staples but trying to staple on top of a nail! Make sure your staples are close to the fabric border, otherwise the ribbon that will be glued on top won't be wide enough to cover them. After stapling, I cut of the rest of the extra fabric, making sure that the old one stays covered.


The staples in place and extra fabric cut off

Next just glue the ribbon to cover the staples. I used a hot glue gun and it worked well.

Step 6, admire your handiwork! 

The chair is done, now you can just stare at it dreamy eyed or even sit on it ;)

 Here's mine photographed in way too dim lighting. Hope the tutorial was useful!

The chair

Sunday, 15 January 2012

Party Night Look

Last night I went to have dinner with friends and finished with a house party. It was a long night, but the food was super delicious and the party was wild and had a two lovely kitties attending also :) Here's my party look!

This is what I used:
MAC Yogurt
Morgana Cryptoria Cryptic
Concrete Minerals Unity
Sugarpill Tako
MSCHIC black gel liner
Urban Decay 24/7 pencil Zero
Random false lashes

I primed the lid with Urban Decay primer potion, then added MAC Yogurt on the whole lid to act as a base to help with blending the colours. Then I patted Cryptic on the lid and up past the crease, leaving a little bit space at the inner corner of the eye to make the look a bit lighter. Also did the lower lash line with Cryptic. Added Unity to the edge of Cryptic and blended well. Just touch of Tako on the brow bone and the inner corner of the eye and it's finished! A really easy smoky eye look. Added eyeliner to the waterline and lashline, the just glued on a pair of false lashes.

A closeup of the eyeshadow, sorry I forgot to take a pic with eyes closed!

I wanted to keep with the purple theme, so I chose Geek Chic Cosmetics' lipstick in My Little Pwny on the lips and added some sparkly gloss on top. I didn't really have time to do anything with my hair, so it's just pinned up from one side with a skeletal hand clip to show my undercut. The blush is by Fyrinnae, I think it's Temptation but I seem to have lost the label since it was a free sample and I put it in a jar instead of the bag it came in. A really deep plum shade anyway, one of my favourites!

Full face. You can see I like purple, right? ;)


Friday, 13 January 2012

Green With Envy Look

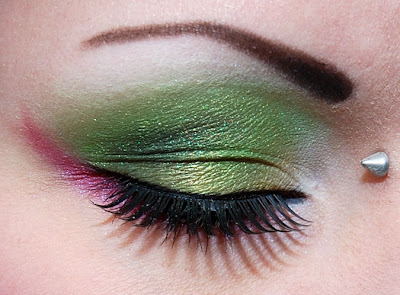
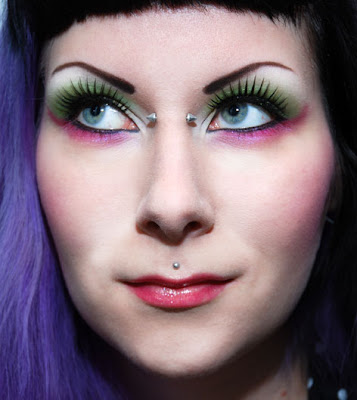
I wanted to participate in Never Too Much Shimmer Facebook group's weekly make-up showcase, this week the theme was Green with Envy. I don't really use green much, I think it takes the colour out of my green-blue eyes, but I decided to give it a go anyway! I have some green shadows so it's about time I learned how to use them :P
To help with my fear of green, I decided to add some pink to the look and it seemed to work out nicely. I managed to catch some natural light today as I was working from home, so the colours look good and true to life.
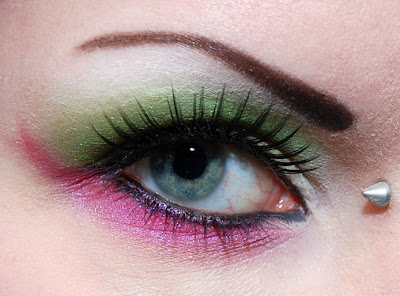
Open eye

Closed eye

Full face

This shows the eyeshadows better, I think!
This is what I used, I listed the colour descriptions also so this can be done with any similar products!

Eyes
Sugarpill Absinthe (Light grass green with green and gold sparkle)
Sugarpill Junebug (Dark army green with green shimmer and glitter)
Sugarpill Tako (plain matte white)
Fyrinnae Dragon Magic (Forest green with teal glitter)
Antoinette's Revolution Liaisons (Strong cool pink, close to magenta)
Antoinette's Revolution Le Soleil (Greenish yellow)
Evil Shades Suffocation (The perfect pink! A cool light pink with a blue shift)
Urban Decay 24/7 Glide-on Pencil in Zero (Black)
Random false eyelashes

Lips & Face
ELF Liquid Lipstick in Pink Lemonade (Dark cool pink)
ELF Natural Radiance Blush in Flushed (A dark shimmery cool pink)

I started with Urban Decay Primer Potion and went on applying some Sugarpill Tako to the inner corner of my eyes. Continued with some Antoinette's Revolution Le Soleil on upper lid towards the center of the lid and switched to Sugarpill Absinthe, working it on the rest of the lid and up past the crease. Added some Fyrinnae Dragon Magic to darken the crease, but it didn't show up that well, so I went over it with Sugarpill Junebug. Added Tako as a highlight below the brow.

On lower lid I did the outer corner and a wing with Antoinette's Revolution Liaisons and switched to Evil Shades Suffocation at the inner corner. Also faded the lower edge of Liaisons with Suffocation. Added black eyeliner and falsies.

Lips were simply done with ELF liquid lipstick, they are one of my favourite products from ELF. Very easy to use, have a nice amount of colour but not so much that they would need lipliner or look silly as they fade away. The blush is nearly the same shade as the lipstick and I just thought it went well with the pink eyeshadow and lipstick, I didn't want to have many different shades of pink on at the same time.

As an afterthought, I maybe should have put Absinthe even higher above the crease towards the eyebrows, or fade it out with some other colour to make a smoother border between it and the Taco highlight. I'll try that next time.

Bonus pic with a smile! I'm so shy about smiling in photos, but I wanted to experiment and thought this picture came out nice :)

Am I green with envy?

Thursday, 12 January 2012

Morgana Cryptoria Black Friday Shopping And Swatches

I got a package from Morgana Cryptoria today, containing stuff I brought on the Black Friday sale.

Packed in a pretty bag!

Here's what's inside.
I had never tried Morgana Cryptoria before, but had read praising reviews of the lip products and had marveled at the shade selection at the web shop. Black Friday seemed like the perfect time to try them out! Unfortunately, there were only a few products available at the sale (or maybe I was too slow and most of the stock was already gone), but I picked a few lippies and a few eyeshadows to get my order total above the minimum sum.

The shipping was fast when taking to account the huge amount of orders placed at the sale and the time it takes to ship to Finland. Everything arrived intact and I liked all the products! Now on to the swatches:

Starburst, 11th Hour, Sapphire Smile, Eggplant and Heliotrope lip balms.
Starburst - Almost black base with teal and purple glitter

11th Hour - Cold dark pink shimmery base with a tiny amount of gold glitter

Sapphire Smile - Metallic dark teal

Eggplant - A brownish warm purple colour. This seemed to be the sheerest of the colours.

Heliotrope - A matte blue based purple.

The picture doesn't capture the nice sparkles in Starburst well, but otherwise the colours are true to life (meaning true to camera flash illuminated life). I'm not sure if Eggplant is really my type of color, but they all seemed really nice and had a nice texture and opacity.

Only Eggplant was in the old type of tube, other colours were in slim lip balm tubes.

The eyeshadows were just something I quickly picked to try out, they are both from the Haunted Eyes collection from 2010. They are both nice shades, with a lot of glitter, but neither was an instant favourite. They are swatched over Pixie Epoxy from Fyrinnae.

All Holos Gleam - A dark grey shimmery base with tons of glitter in mostly in teal, but also purple, orange, red and yellow.

Cryptic - Dark blackened plum matte base with purple glitter


All Holos Gleam and Cryptic. Cryptic had much more glitter in real life!

All Holos Gleam glimmering in the jar!


One more angle of All Holos Gleam just to show off the amazing glitter.


Wednesday, 11 January 2012

Storing A Ton Of Stockings

Today I took on the task of organizing my huge pile of stockings. They were all tangled up and I just used the top ones in the pile, because it I wasn't up for detangling stuff early in the morning when dressing. I did some googling and the best advice I found was to store every pantyhose in its own ziplock bag. So basically that's what I did. Bought a ton of bags and spent an hour neatly packing the 'hose. I put the bags in empty shoe boxes so I wouldn't have to put them on top of each other and risk ending up with a mess again.

I also got new batteries for the camera flash, so I had to take some pictures!
Tons of stockings. Also a kitty in the background.

Neatly arranged box of coloured pantyhose.

Bonus picture of today's make-up! I was very funny and wore Unity eyeshadow by Concrete Minerals to go to a Unity 3D workshop. Also on the eyes Chroma from the same company, and some Tako by Sugarpill. A random elf lipstick, can't remember the name.
Sorry about the powder on the eyelashes, it was late!

Closeup of the purple eyeshadow.

Tuesday, 10 January 2012

Jewelry!

I made some necklaces to be sold at Desucon Frostbite! It's an anime themed convention happening next weekend in Lahti and I was very happy that my friend wanted some jewelry to sell. I love making things, but with a huge collection of earrings and necklaces I don't really need any more for my self at the moment.

I made some skull cameos from cameos and settings brought from Etsy, and finished a few glittery molded resin pendants. The glittery glass ovals are my new favourites, I've been wearing a similar one for a few weeks to test if the glue I used for them holds, and it seems to work just fine. They are super shimmery and pretty!

The packaging was made in a hurry, but turned out really nice. I had black cardboard, small zipper storage bags and some sticker paper that can be printed on. I scribbled half of the skull design, finished it in Photoshop and printed and cut the stickers. (I would have wanted the white sticker to span the whole width of the cardboard pieces, but I placed the skulls too close to each other and there was no space left.) I then placed the stickers and made slanted cuts to each side of the cardboard pieces, wiggled the necklaces in place and bagged everything. They are not perfect, but I'm happy and it was fun making both the jewelry and the packages!

// Kaulakoruja myyntiin Desucon Frostbite -tapahtumaan Lahdessa! Löytyvät Kuroi Nekon pöydästä. Muutamia pääkallo-kameoita, valettuja glitterisiä hartsikoruja ja lasisia glitter-koruja.


Related Posts Plugin for WordPress, Blogger...