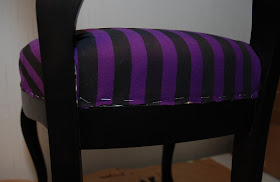
I needed a new chair for my vanity and since I like crafts and didn't want to settle for anything ordinary, I came up with an idea to customize an old chair to fit my taste better. This is the result:
 |
| My lovely chair! |
Here are the instructions for how you can make a lovely gothic chair, too.
You need:
A wooden chair
Fabric, as much as the chair originally has (and fabric dye if you want to customize it)
Ribbon, as much as the chair originally has
Sandpaper, 120 grit
Painter's tape
A small foam paint roller
A small paintbrush
Paint
Staple gun and staples
Hot glue gun or some other glue suitable for fabric and wood
Step 1, the chair:
Find a chair with a nice shape to start with. Anything wooden will do, and chairs with small cushions have less work.
I purchased a second hand chair with a nice rose carving and lovely curvy legs.I paid 70 euros for it, including shipping. It was all intact, so I decided to just add my new fabric on top of the old one and paint the wooden parts without taking the old fabric off. If the fabric would have been torn or worn out close to breaking, I would have taken the old fabric off. It's held in place with small nails.
 |
| The chair before |
Take off the decorative ribbon covering the edges of the old fabric if there's any (save it or measure it so you can buy new ribbon) and sand the wooden parts. I used 120 grit sandpaper and just quickly went over the wood to break the surface of the varnish. This helps the paint to stick better. You can poke at the tricky parts (the small indents in the rose or other decorations) with folded sandpaper, but I wasn't too concerned about not sanding all the crevices since they hardly get any wear when the chair is used.
Step 3, painting:
I used the same small foam paint roller to paint the dye, it worked really well. I did two or three coats, it was easy to tell if the purple still showed though. Dark colours are easier than light ones, because on light fabric it really shows if you make a mistake.
I let the dye dry overnight like the instructions on the bottle said and ironed it to fasten it.
Step 5, covering the old cushion:
Next I cut off some of the extra fabric just so I can better see what I'm doing and used a staple gun to fasten it to the chair. If you have the old fabric still beneath, like I did, watch out for the nails that keep it in place. You'll get curly staples but trying to staple on top of a nail! Make sure your staples are close to the fabric border, otherwise the ribbon that will be glued on top won't be wide enough to cover them. After stapling, I cut of the rest of the extra fabric, making sure that the old one stays covered.
Next just glue the ribbon to cover the staples. I used a hot glue gun and it worked well.
Step 3, painting:
Use painters tape to shield areas you don't want to have paint on them. Someone with more patience might have taken off the whole cushion, but since I'd rather go for the easy and fast alternative, I just used tape and it worked fine.
Then paint! I chose a black paint with satin finish (which was already lying in my closet) and painted it on with a small foam roller. The parts that I couldn't reach with the roller I painted with a large watercolour brush, but a stiffer brush would have been better. The brush leaves a shinier surface, but I just sprayed some matte varnish on those parts after the paint was dry and they looked fine.
I used a paint that can be thinned with water, so it didn't stink and I could paint indoors and wash my tools easily. You need a few coats to get darker colours even.
Step 4, fabric:
 |
| Painting in progress |
 |
| Neatly placed painters tape |
 |
| I just taped the edges because the part behind the cushion won't show. |
Step 4, fabric:
The fabric. Measure the cushion(s) of your chair and buy fabric and the decorative ribbon if your chair has any. I took the ribbon with me to the store to make sure I'll get one with similar width so it can cover the nails and staples I will use to fasten the fabric.
Or do it like me, go to the fabric store and think everything is too boring and dye your own fabric! I wanted something ornamental or black and white stripes or something purple. I found a discount upholstery purple in a really nice shade and paid around 5 euros for it. I also bought black paint-on fabric dye for 6 euros.
I wanted striped because they were easy to make and looked nice, so I just masked parts of the fabric with tape. I would recommend painters tape, but since I had already spent all of mine on the painting part of the job, I used electrical tape. It worked ok, but since electric tape stretches a bit it pulled my fabric and made the painting harder. So remember to buy extra painters tape!
I didn't measure the stripes, but for a good result you should, or you could coat the entire fabric piece with tape and then take out every other tape to produce the pattern. Mine didn't come out completely even, but I can live with that.
 |
| Fabric with tape to mask the stripes |
I used the same small foam paint roller to paint the dye, it worked really well. I did two or three coats, it was easy to tell if the purple still showed though. Dark colours are easier than light ones, because on light fabric it really shows if you make a mistake.
 |
| Fabric with dye painted on it |
 |
| Ironing the fabric is important, usually I'm too lazy to do it |
 |
| Finished fabric. You can see the stripes are not even, but who cares? ;) |
Step 5, covering the old cushion:
Put the fabric right side down on the chair and mark any corners with pins and then sew them. Don't worry about the extra fabric, just make sure you have enough to cover the cushion.
 |
| A folded, sewed corner |
 |
| The staples in place and extra fabric cut off |
Next just glue the ribbon to cover the staples. I used a hot glue gun and it worked well.
Step 6, admire your handiwork!


Can you come decorate my house? Seriously? That chair is gorgeous.
ReplyDeleteThanks! I'll just pack my paintbrushes and staple gun and be right over ;)
Deleteswoons..... That is GORGEOUS!!! I always have ideas/plans to do things like that but they never get done. That is seriously a gorgeous chair. After your done at Luna's house can you come do mine? I pay in makeup. :D tee hee
ReplyDeleteThanks dear! I'm in the zone when doing things, the planning phase is not one of my strong areas. I'll stop by after Luna's ;)
DeleteI am in so much love with this. I wish I had that kind of patience!
ReplyDeleteThank you! Patience it not among my virtues, but being quick and efficient because I'm so impatient is ;D It was actually pretty easy once I had all the tools and enough space to do everything.
DeleteThat is just lovely!! thank you for the tips! i just now have to find one chair like this to make it!!:)
ReplyDeleteI hope you have as much fun as I did! :)
Deletelovely very creativ !
ReplyDeleteOooh, found this on Pinterest and I love it!
ReplyDelete