Pages

Thursday 27 February 2014

Another Hot Pink Look

I loved Smitten, so I played around with another hot pink eyeshadow too. This is Obsession by Aromaleigh, seen also on my pictures with the swapped dress before. It's a matte hot pink and blends nicely. I used it here with a matte white in the inner corners and on brow bone, and there's just a hint of plum purple shadow (Sugarpill Poison Plum) in the crease, but it doesn't really show.


Tuesday 25 February 2014

Sugarpill Smitten

Smitten loose eyeshadow is a limited edition item by Sugarpill. I ordered it as a part of their Valentine's bundle, which included a set of brushes along with the jar of eyeshadow. Smitten is a gorgeous, deep, vibrant hot pink with lots sparkle.

A smoky look with Smitten. Only other products used were primer (Pixie Epoxy by Fyrinnae) black gel liner and mascara.


This one is to show the sparkle better.


I wore Smitten with a matching lip product, it's Maybelline Super Stay 10H Tint Gloss in Forever Fuchsia.


Unlike most Sugarpill loose shadows, Smitten comes in a jar with a white lid.


Smitten in the jar.

I'm really fond of this shadow! Some bright pinks don't work well on my skintone, they make me look like I cried my eyes out the previous night, but Smitten is just the right shade to look stunning with no eyes-red-from-crying -effect. It's a cool toned pink, which might be the trick. The shimmer does not show well over a non-sticky primer, especially if you blend the shadow the sparkle disappears. This way it can be used as a less shimmery pink too. On top of a sticky primer the shimmer and sparkle really comes out!

Monday 24 February 2014

More Dress Pics

A few more pics from the weekend. I'm wearing Aromaleigh eyeshadow called Obsession, which I bought at the swap. It's such a nice shade of hot pink, a tiny bit too warm for my skin tone, but I'm sure I'll find some other shade that makes it work!


I'm quite excited for continuing the half-sleeve. I want more lace and skulls and flowers on my skin!


I love my nails in the last one ;P Since I started using nail oil regularly, they have grown nice and long and won't break as easily as before. Finally I can wear all my sparkly nail polishes even without first doing gel nails! Gels are nice but I'm too lazy when it comes to maintenance. Maybe at some less busy time of my life I'll wear lovely stiletto nails again :)

Saturday 22 February 2014

New Things from the Swap!

My other half took some pictures for me today, because I wanted to get nice pics of the dress and New Rock boots I got from the clothes swap. I even took the time to fiddle with Photoshop to make the pics look decent :)


I swapped the dress with Ravenoaris, she had bought it second hand and apparently it was hand-made by some previous owner. It looks like it's inspired by Lip Service's tartan dresses, since it has the same type of little train that can be lifted with a clip and a D-ring in the back. It needs a tiny bit of sewing on the inside edge at the back, but other than that, it's in perfect condition. I just maybe should have ironed it before taking pics ;P


I'm so excited about continuing the tattoo, I've always dreamed of a full sleeve and I like the colours and symbols in it right now. The lower part will have roses, cat skull and a bird skull, maybe some more lilies too if there's any room left.


The dress has straps with nice little buckles. I'm also wearing the Aromaleigh eyeshadow I bought at the swap from Jenni!


And the boots! I'm so in love with these! They have a taller, more detailed platform than my old ones and the heels with the metal plates is super cool. They have patent leather flames appliqued on top of regular matter leather.


The bat clip is old, it's made by me but I always forget to use it!

Friday 21 February 2014

Spring is Coming!

It's abnormally warm for this time of year and the snow is almost gone. I'm feeling very energetic, even with my busy schedule I've managed to get some extra tasks done. I want to focus better, so I'm selling off things related to hobbies I'm not so fond of any more. The aquarium is already empty (all the little fishies and plants found new homes) and I only have one gecko left. I also sold a pile of dolls and even went through all my eyeshadows to let go of a few that I very rarely use.


As for the new things, I booked an appointment to add to my half-sleeve tattoo. I'm so excited, the artist was very inspired and full of ideas and I felt that he really listened to me and was interested in the project. He's going to send me a sketch in a few weeks and I also asked him to see if some lace pattern could be added to the edges of the current tattoo. Can't wait!


Last weekend I went to swap clothing with fellow goths, it was such a nice event! I have a huge pile of things to sell or donate, thanks to the early spring and the energy it gives me. I got rid of many things and brought in a few new ones that I hope will see more use than the old ones. I was really frugal up until I found a gorgeous pair of New Rock boots in my size and just had to get them ;P But I sold/swapped a dress, two tops, a few eyeshadows, two pairs of pants and a pair of boots, and got/bought two belts, an Aromaleigh eyeshadow, a long purple dress, a black high waisted skirt and then the lovely New Rocks. I hope I will have the time to take pics of the boots in the weekend, they are so cool with patent leather and a detailed metal heel!

Next week I'll do some dancing again (finally!) and hope I won't strain my arm again any time soon ;D And I just found a new and better subject for my thesis, so I'm not about to run out of things to do any time soon...

Thursday 20 February 2014

Sugarpill Smitten Look

Sugarpill offered a Valentine's bundle a few days before Valentine's, and I immediately bought it. The bundle had the limited edition loose eyeshadow Smitten and the new Sugarpill brushes. Here's a look using Smitten!

I used Sugarpill Mochi on the lid, but these shades didn't go together as well as I hoped. Smitten is so bright it makes Mochi look a bit washed out, since Mochi is more of a pastel shade. Next I'm planning to try a smoky eye with Smitten, because it's just a gorgeous shade! But not tomorrow, I need to look "professional" for work because we have visitors, so neutral shadows it is ;P


Smitten in the pot. So bright and shimmery!

Wednesday 19 February 2014

Outfit of the Day

I worked from home today, so I had time to get some pictures of my outfit when heading out for lunch. I bought these iconic Actual Pain leggings after seeing them in so many blogs, and they are really comfy to wear, I'm glad I got them!


Tuesday 18 February 2014

Femme Fatale Shadows Galore Look

Yet another Femme Fatale look! This time I used many shadows.

These are:
Velvet Fog, a greyish blue with teal shimmer on the lid (on a white base).
Dreamstate, a medium-dark blue with teal and magenta sparkle in the outer crease.
Exorcism, a medium shimmery purple on the inner crease.
Deepmoss, a dark teal in the outer corner and on the lower lid.

The shadows blended easily and I'm really pleased with the way the colours melt into each other in this look.


Monday 17 February 2014

Deepmoss Look

Did I mention I LOVE Femme Fatale's duochromes? Yes? Well here's one more still ;P I was silly and forgot to order Deepmoss when I bought the prizes for the giveway, so that meant that I had to make another order and get it. And a couple of other shadows...

Deepmoss looks dark green in the jar, but goes on more teal when the metallic shine comes out. The base is dark, but does not look like black like with some other duochromes. Deepmoss is a dark green with a gorgeous teal sheen. I did a smoky eye look with it.


Sunday 16 February 2014

Winner of the 600 Readers Giveaway


We have a winner! The lucky number was two, which mean the winner is...


Congratulations! I have sent you an email so I know where to send the prizes :) Thanks to everyone who participated, it's great having such lovely readers!

Friday 14 February 2014

Behind the Scenes

A few behind the scenes snaps of the photoshoot. Niina's shoelace was untied ;P Her latex outfit is gorgeous!


Thursday 13 February 2014

Flash Photoshoot

Yesterday I did a little shoot with Jukka who had gotten a new flash for his camera and wanted to get to know it better, and Niina who was also modeling. I wanted to try editing colourful pictures, so I packed a bag with sequins, glitter and non-black garments and off we went to take some pictures! Here are the one I picked to be the best, edited by me. I recently tried out the newest version of Photoshop and tried some new tools with these. The content aware fill even understood how to continue the sequin pattern! Then again on all-white background it sometimes thought I wanted another foot in the picture.


This was the last of the Iron Fist skirts I ordered, it's so gorgeous! Just my kind of colours! The boots are by Pennangalan, headdress is from Glitter and the cute little skull candle is Jukka's own ;P


This top was on discount, it actually has a long "tail" in the back. It chiffon, so I have a black top under it.


This skirt was an impulse buy from GinaTricot. I've been drooling over teal coloured sequin things for quite some time and just couldn't resist when it only cost ten euros. There were only a few sizes left, but I was super lucky that one fit me! My sister brought the shirt from the states, it's one of my favourites for summer wear.

I think the pictures came out great, and I love how my hair looks in them! Also the glitter shoes really shine and work well with the clothes :) Thanks Jukka and Niina, it was a great shoot!

Wednesday 12 February 2014

Something to Listen to

Boo, I strained my arm while dancing, so it needs some rest and I didn't have any nice photos stashed away, so this is not much of a post! Here's something you can listen to, instead of looking at my pictures. It's the podcast my other half, Arttu, does with our friend Rafael. They have many new episodes and more are coming.

http://wearenotheretopleaseyou.blogspot.fi/

I especially recommend episode 9, because they played a game where I answer questions that Rafael chose, and Arttu tries to guess what my answers were. I think I totally won the game at the question about his dream holiday ;P

Monday 10 February 2014

How To Make A Loose Synthetic Hairfall


I like big hair, but it's a pain in the behind to back-comb and then comb out the tangles the next day. That's why I came up with a great way to have the big, back-combed look with less hassle, a loose synthetic hairfall! I made one in purple when I had my previous haircolour, but needed another one now with the turquoise. Here's how to do it.

You need

  • 2 packets or more of synthetic hair
  • Matching colour stretch lace or fabric coated elastic band, about 40 cm or 20 inches (if you can't find a matching shade, you can use black if you hair is dark and beige for light hair)
  • Something to suspend the elastic/lace on or between when you work on the fall
  • Two chairs to lay your hair on while you work


1. Find matching loose synthetic hair

If you have a shop selling synthetic hair close to you, you can go and match your hair easily. If you order online, finding a shade that matches can be harder. I suggest looking at colour charts at more than one shop and googling user pictures if any can be found. For a more natural finish, you should use more than one colour of hair. My fall has petrol green, blue and black. For a big, fluffy style you should use crinkly textures hair like most jumbo braid varieties. Steer away from very smooth hair types.

I ordered my synth hair from Diversity Hair, the shades used are Petrol Green and Blue Teal, the brand is Divesity Hair's own jumbo braid.

How much hair do you need? My fall has 1,5 packs of the base colour, Petrol Green, and about half a packet of Blue teal, and a few strands of black as accents. For a fuller fall you need more, but two packets should be enough when you finish the fall with back-combing.

2. Setup

I took a large basket with handles and tied my elastic to the handles. It's easiest to work when the band is suspended. Open the hair packages and put them on the backrest of a chair, with the middle of the hair bundle on the top of the backrest. Reserve another chair for separating sections of hair from the bundles.

I ended up not using the purple after all. The black I used is not in the picture.
3. Separate sections of hair

Take small sections of hair (half the thickness of a finger of a little bit more) of the colour you want to be the base of the fall. Spread them on the backrest of another chair. Add small strands of a second colour if you want to use one for a more interesting look. I used a more blue-ish teal to make the the shade match my hair better.


How much of the complimenting blue I used per section of teal.
4. Tie the sections on the hair on the elastic

Grab a hair section and fold it gently at the middle. Take the ends of the section and pull them through the loop so that it wraps around the elastic band. The pictures explain it a lot better ;P


Gently fold but make sure to hold on to the loop.

Put the loop next to the elastic band.

Pull the ends through the loop so the elastic is wrapped in the hair.

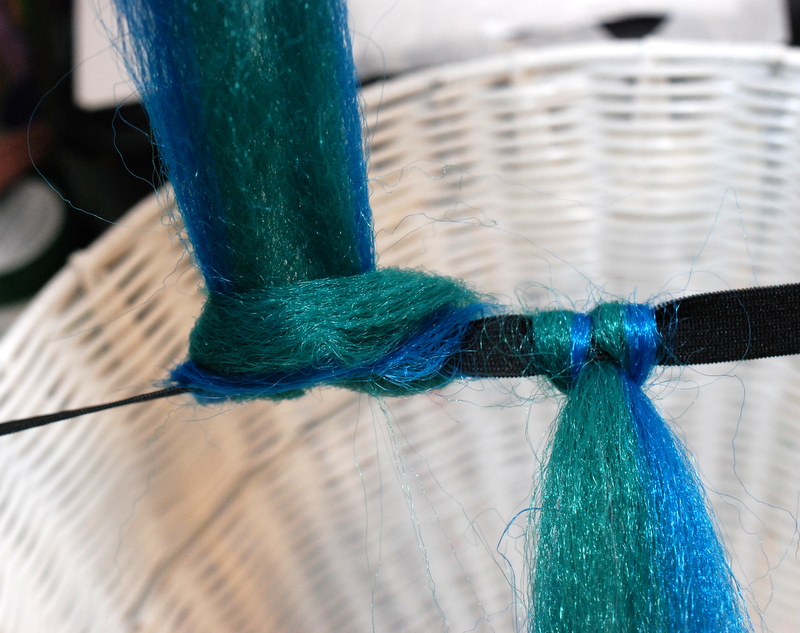
Pull all the way through...

And tighten!

This is what two sections on the band look.

Here's only one section.
Use up the sections you have made, then separate a new batch of sections from the hair bundles, add some accent colour and tie them to the band. The sections tend to loosen a bit once you have tied then, but don't worry, you will tighten them in a later step.

If you want to use small accents sections on top of mixing two tones, you can add them once you have all the base colour on the fall. Just pick a spot for the accent, find the place where two tied section are side by side, gently pull them apart a bit and tie the accent in the space just like all the other sections.

You should have about 10 cm of loose elastic band on both ends of the fall when you finish. Keep tying sections until the 20 cm in the middle are covered.

This is what my fall looks when there's enough hair on it.

5. Optional: Braid the sections

Some people like to braid the hair sections for a centimeter or two to keep the hair in place better. You can also heat seal the braids with a small straight iron. I don't personally do this step, I think the hair is well enough in place without braiding.

6. Secure the hair in place

If used a sewing machine and a zig-zag stitch to secure the hair on to the elastic. The foot wants to snag on hair, so instead of doing it like I did, I can recommend putting a sheet of paper on top of the hair and sewing on top of that to avoid getting the hair caught in the machine.


7. Back-comb, cut, style!

You are almost finished! Now you can cut the fall and back-comb. I recommend using some sort of styling product to give the hair some texture, I used spray-on gel. If you cut the fall to have layers, it's easier to back-comb to a big, high style.

8. Put it on

This is basically what you have now. A large mass of hair on an elastic band.


Put your hair on a bun, bend from the waist and grab the fall.

Wrap the fall around your bun. Ideally, the width of the fall should be the same as
the circumference of your bun.

Tie the ends.

Tighten, use hair clips for extra security if you know you'll be dancing your ass off!
Flip the hair over the bun, tousle it with your fingers, add some hairspray to keep it in place if needed, and you are done!

This is how mine looks, I didn't cut it yet but I think it's a bit too long right now. It's back-combed lightly. I think the colour match is quite good!


Super easy big hair! You'll be so happy when you come home in the middle of the night dead tired, and instead of trying to comb the hair you can just untie the band and let your natural hair down. No more tedious untangling and damaging your hair! For shorter falls, you can cut the loose fiber bundles in two before starting to make sections or tie them. Or you could make two smaller falls to have cute puffy pigtails :)

Here's a picture of my previous loose fall. It's shorter and more layered. The flowers clipped
at the base are a great way to hide the transition between the fall and your natural hair!
Related Posts Plugin for WordPress, Blogger...