Pages

Showing posts with label MAC. Show all posts

Monday, 23 May 2016

MAC Viva Glam Ariana Grande Lipstick

Do you know MAC lip pencil in Nightmoth? Have you ever wanted a matching lipstick? I know I have, and I finally found one! Sadly it's limited edition, but there are still some on the counters. When I first saw the swatches for the Viva Glam Ariana Grande lipstick, I knew I wanted it. Sadly my local MAC counter got only a very limited amount (I'd guess two) of the lippie and I wasn't fast enough. Well, on my way to a conference in Berlin last month, I had some extra time on the Helsinki-Vantaa airport and thought I'd check out the MAC counter there, as it was right next to my gate. And there it was! The still had plenty of Ariana lipsticks just waiting for a new home!

Ariana, like the Nightmoth pencil, is a deep, dark, muddled red. It's a matte finish, making the colour look even deeper. I'm a sucker for deep reds and the consistency and wear of the MAC lipsticks is the best I've found in traditional wax based lipsticks. So when you want more of a satin finish than with liquid to matte lipsticks, the MAC mattes are a good choice. I took pictures of the lipstick lightly and heavily applied, as it works both ways.

MAC Viva Glam Ariana Grande lipstick lightly padded on lips.

MAC Viva Glam Ariana Grande lipstick lightly padded on lips.

MAC Viva Glam Ariana Grande lipstick heavily applied.

MAC Viva Glam Ariana Grande lipstick heavily applied.

Wednesday, 2 December 2015

Mac Black Night

Yesterday I treated myself to a new lipstick! Mac came out with a new collection called Dark Desires. I'm usually a fan of dark shades and this was no exception. I'm not too keen on single pressed eyeshadows, but one of the lipsticks caught my eye. This is Dark Night.


It's described as a black lipstick, but on goth standards, it's a very easy-to-wear black. It's sheer and can be used on top of other shades to darken them. The best part is the wonderful shimmer. There's copper shimmer and just a hint of green shimmer, creating a very unique sheen to the lipstick.

I tried Dark Night on top of Nightmoth lip liner and really like the result. I applied the lipstick in two phases, first heavily on top of the liner, then blotted with a paper a few times, and then added a light layer for extra shimmer.

I can imagine how gorgeous Dark Night looks on top of black liner, but it should also work on top of blue shades. I'm excited to try out all the combinations!


Tuesday, 3 November 2015

Autumn Look

Today I took some time off from work to head out with a photographer friend to do a shoot we had planned to happen during the summer. Both of us are so busy that we had to change the schedule a few times, but finally got it done! I naturally don't have the finished photos yet, but here's the make-up look I did for the shoot.

The eyeshadows are Girl Crush and Fairfax, with Girl Crush as a base and Fairfax padded on top for a smoky look. Red Cherry false lashes #600, my current favourite pair. The lipstick is Mac Cyber, with Cyber World liner that I just bought yesterday. It's a very close match to Cyber. I did my brows in black to go with the black wig I wore for the shoot.


And a little taste of what's to come! The gorgeous shades of brown and orange were just perfect with a black outfit, and this was a very warm day which suited running around without a coat on nicely.


Sunday, 8 February 2015

Video Look

Here's a super simple look I did on Thursday. I was doing an interview about the game I'm working on, and the reporter wanted to do it in video. I usually wear only a little bit make-up to work, especially at this stage of a project when things are quite hectic, but I wanted to look nice for the video so I put on a decent face.

My thought was that dark lips and neutral eyes would work well on screen and not take away from my freshly dyed locks. The lips are Mac Nightmoth pencil and Cyber lipstick, and eyes are done with Coastal Scents Revealed palette. I'm happy my bangs are finally long enough to be swept aside, they've been a tiny bit too short for what seems like ages! ;D


Tuesday, 25 November 2014

Adora Batbrat Look

For yesterday's mini-photoshoot with the new corset I wanted to try out an Adora Batbrat inspired look. I adore (get it? ;D) the way she does her heavy black eyeshadow and her intricate decorative lines and jewels incorporated in the make-up.

Here's what I used (aside from BB-cream and powder):

MAC Fluidline in Blacktrack, black gel liner
Sugarpill  Bulletproof, matte black eyeshadow
Red Cherry lashes
Sugarpill Dewdrop lashes, cut
Claire's body jewels in baby pink and dark purple
Claire's silver bindi
Revlon Precision Lash Adhesive, a latex free lash glue
Nyx Soft Matte Lip Cream in Copenhagen, a dark wine red
Maybelline Fit Me Blush in Deep Rose, a dark cold red

Here's the look!

And a close up.

I started out by drawing the wing outlines on my lids with the gel liner and a stiff, small brush. Apparently my mind was wandering because I forgot to put primer on my lids, so please ignore the slight fading in the pictures. With a good eyeshadow primer colours come out more vibrant and black is blacker. I usually use Urban Decay's Primer Potion.

When I felt the wing outlines were symmetric enough, I filled them in with the gel liner to achieve a deep black. On top of the gel liner wings I applied matte black eyeshadow to deepen the shade even more and to gently blend it out towards the inner corner of the eyes. I then took a blending brush and blended the black over the edges of the wings to soften the transition. I also applied a generous amount of black on the lower lids, blended out.


Then on to the liner! I grabbed a thin eyeliner brush and set to work. I decided to not even try the more complicated ornaments Adora does and go for simple long lines with jewels for decoration. In addition to overly long cat eye liner, I drew two long lines on the bottom and two on the top, and added a second line to one of the top ones to make it a spike like pattern. I think that wasn't such a good idea, so just do simple lines if you try this look! Adora often draws the lines to go over her eyebrows, but I felt on my face there was no room with the slanted bangs. I applied a touch of black liner below my lower lash line too, with a line that "opens" in the inner corner to make my eyes look bigger.

Decorating with the jewels was easy. I had a pack of small body jewels by Claire's. They came with their own glue on the backside of the jewels, but that was total poop, I just added a touch of lash glue after losing a few stones due to the weak glue. I used tweezers to position them. In my look there's 8 stones, two at the inner corners of eyes, two at the end of the cat eye liner streaks and four at the ends of the lower long lines.


Lush lashes are Adora's trademark, so I grabbed a pair of long human hair lashes by Red Cherry from my stash. Adora's are waaayyyy longer, but these were the closest ones I had. She usually wears lower lashes too, so I took a pair of Sugrapill Dewdrop lashes that have nice sequin decorations and cut them in half. They were very long and heavy to use on their own, I think cut they will see more use. I glued the cut strips to the lower lash line with the sequin side up. Normally as upper lashes the sequins would face down.


For finishing touches I applied dark blush heavily (the camera fades the colour, IRL it was VERY visible!) on the centers of my cheeks and put on dark lipstick. The bindi was an afterthought. Adora uses plastic jewels on her forehead, the bindi is a far cry from those, but I like the sleek look of it.


No primer = streaky eyeshadow! Always remember to use primer!


I really liked the little jewels and I think I'll use them more often from now on. You can basically use any jewels, from expensive Swarovski crystals to any cheap-o plastic rhinestones. Prepare to lose a few per night, so go for ones you don't mind getting lost!

The lower accent lashes are also very nice, they open up my small eyes. You can feel them when you are wearing the lashes, as these long ones touch your cheeks, but you get used to it quite fast and it's not unpleasant.

I think next time I'll try to draw the wing further out to get more oomph to the look and perhaps add a few more lines to make them more balanced. A darker lipstick or a two-tone look with black on the edges and dark red in the middle might also work well with the heavy eye make-up.


It's fun to try on new looks and you always learn a few things along the way!

Friday, 4 April 2014

Dark Soul and Melon Look

I bought some synthetic dreads from the lovely Heidi of Mustaa Kajalia blog, and when she said she put a little surprise in my packet I never would have guessed it to be two MAC pigment samples! I love both shades and did a look with them the very same day I received the package. One is Melon, a peach shade with a gold shift, and the other is Dark Soul, black with a small amount of silver/gunmetal sparkle. I've actually never tried a pigment by MAC before, and I was really impressed with the quality. Melon sticks very well and stays put great! Dark Soul might be a bit more opaque than I'd like, but I have to try a smoky look until I decide. It's very pretty and easy to apply still.

Thank you so much, Heidi!

Melon on the whole lid, Dark Soul as liner, applied dry.

I paired the pigments with a peachy blush and a sheer lip gloss in the same shade.

Just look at that golden glow!

Friday, 16 March 2012

Neutral for the Day, Dramatic for the Evening

I did a neutral look in the morning to wear at work and upgraded it to a more dramatic look in the evening to go to listen to Oldschool Union at a private event.

I put Moonchild from the inner corners to the centre of the lid and continued with Wraith for the rest of the lid and also put in the crease. For the evening, I added some Wraith to make the colour more vibrant (or it might have faded a bit during the day) and put a small amount of Bulletproof in the crease and blended it with Wraith. I lined my waterline with Blacktrack and added some mascara, too.

I used:
Detrivore Cosmetics Wraith
Fyrinnae Moonchild
Sugarpill Bulletproof (added for the evening look)
MAC Fluidline Blacktrack
Lumene blush Sweet Blush

Lips
Lumene Lingonberry Lip Stain Eternity (for the day)
Elf lipstick Classy (for the evening)

Morning look
Just leaving for work!

Morning look

Evening look

Evening look, I also put my hair up!


And here's the evening outfit! I added a bolero on top before going out, just in case it would be cold at the venue.


Dress - Lip Service
Shoes - Spirit Store

Wednesday, 14 March 2012

Turquoise Look and Outfit

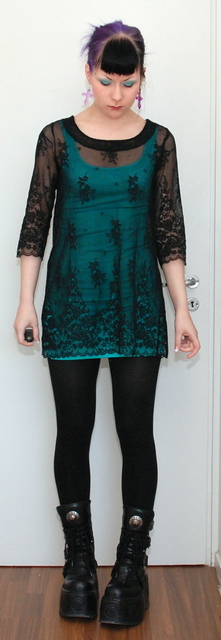
I bought a black lace tunic last week and noticed at home that I only own black dresses to wear underneath it. I do have some purple, pink and patterned clothes, but no basic stretchy fabric dresses. So, yesterday after work I went and purchased a turquoise dress (and lavender hotpants, but I have no picture of those since the temperature was still below zero), I would have wanted a purple one, but after checking three shops and finding no purple dresses, I made do with the turquoise. Today I put the new dress on and the lace tunic on top of it, slapped on some matching eyeshadow and went off to work. I felt a bit insecure wearing something so colourful, but I think the outfit worked.

For the makeup, I used:

Glamour Doll Eyes Fabulous!
Sugarpill Tako
Lumene Lingonberry Lip Stain Eternity
Elf Natural Radiance Blusher Flushed
MAC Fluidline Blacktrack


My earrings are also new, I made them myself!


Turquoise and black lace

Lace tunic - GinaTricot
Dress - H&M
Shoes - New Rock


Here's bonus pictures of yesterday's outfit, this is what happens with very interested cats participating! I also have a belt to lessen the sausage look that came from wearing black lace on a black base.

Nana wants attention

My hair is a mess and Möttönen squeezed into the pic

Apparently she just needed to stretch!

Friday, 24 February 2012

Starling Look

I only have one picture of this look, somehow all the others turned out to be blurry or just otherwise bad. I did tiny eyebrows just because I thought they looked cool and quickly put on some eyeshadow and liner. I wore this for playing boardgames with friends, so not a big event ;) I and played horribly, one mistake on round three and the seven rounds after were just waiting since there was no way to get back on your feet! Otherwise I liked the Game of Thrones boardgame, it had lots of scheming and interesting tactical choices. Now I also know that it has no "rubber band" mechanic to get players back in on the action if you mess up in the beginning ;) Better luck next time!

I used:
Sugarpill Tako (on inner corner and towards the centre of the lid)
Sugarpill Starling (outer corner, lid and crease)
MAC Fluidline Blacktrack
Kanebo 38 Mascara


Thursday, 23 February 2012

Cranberry Champagne Look

Here's a look I did with Cranberry Champagne eyeshadow from Evil Shades. It's a dark red colour with metallic shimmer and I felt like it went well with my green eyes. Even my other half asked if I had coloured contacts on!

I used:
Evil Shades Cranberry Champagne (on whole lid)
Fyrinnae Moonchild (inner corners)
MAC Fluidline Blacktrack
Cheap Ebay eyelashes
Kohl pencil
Kanebo 38 Mascara


Apparently I somehow got a ton of shadow on the lashes. Whoops!


I didn't have anything on my lips so the full face looks a bit blah.

Sunday, 19 February 2012

Gradient Eyeliner

We had friends over, so I thought I might as well try to look nice and opted for nude lips and colourful eyes, and did a look that fit the Never Too Much Shimmer challenge for this week. We had some pasta, cheese cake and watched a film called TrollHunter. I couldn't keep my eyes open long enough to see the other movie, but it was a Czech animation and looked scary with stop motion clay animation and a dead rabbit. As a conclusion, I'd say food and friends go well together, and Norwegian sounds funny. It's like they have no space between words, just this constant mumble ;)

On to the look! The challenge was gradient, so I did gradient eyeliner. I put a line of black on my lid first, then did the gradient line above it. It doesn't suit my heavy lids very well, but was still fun to do. The colours wanted to transfer on to my upper lid even with it covered in nude shadow.

I used:
Urban Decay Primer Potion
Evil Shades Mixing Medium
MAC Yogurt (on the whole lid)
Lost in Makeupland blush Alive
Dermosil lipgloss Classic Rose

Eyeshadows starting from the inner corner of the eye:
Evil Shades Bittersweet Symphony
Sugarpill Magentric
Antoinette's Revolution Marie Therese
Fyrinnae Faerie Glamour
Sugarpill Starling


Dermosil Classic Rose, a nude gloss

The earrings were made by me!


Related Posts Plugin for WordPress, Blogger...