Another UV-gel nail tutorial! This time I'll be using nail forms, the funny little metallic stickers. It took me a while to even realise what they were (I got some with the nail kit, but no instructions), but they actually work pretty well.
Nail forms can be used to alter your nail shape and add length. Making nails with forms takes about 1,5-2 hours, depending on how much length you want to add and how neatly you get the gel spread.
1. Get everything you need out so you can reach it well. You should open the gel pot before starting to add the forms, because it's really tricky to get the lid off when you have the stickers on your fingers. It's beast to do one hand at a time.
You need:
UV-gel (Builder gel type, no top coat needed if you will be adding nailpolish on top)
UV-oven
Cleanser (Acetone, don't use nailpolish removers with added oils. Pure acetone is the best)
A brush
A nailfile
Lint-free wipes
Nail form stickers
 |
| Here are the tools. You don't need the top coat! My wipes are actually pieces of an old bedsheet, they work well. |
 |
| Nail form stickers. I got a bit overly excited and ordered a roll of 500 stickers after losing my nerves when I ran out of them in the middle of doing my nails ;) |
2. Remove all traces of old nailpolish and/or gel from your nails. File the nail surface to make it a bit rough, so the gel has something to hold on to. This is a very important step, all your efforts will go to waste if the nails don't stay on! Push back your cuticles. Wipe your nails with cleanser when you are done. You can save the wipe and use it again later on, as there's usually not much oil on your nails.
 |
| My nails primed, they have been filed and wiped with cleanser. Note how short one of the nails is, this will be fixed soon! |
3. Put on nail forms. Take one sticker at a time and peel off the backing. Poke out the hole if the circular part doesn't stay on the backing nicely. Tear along the dotted line to open the bottom part so you can adjust the forms better. You should aim to making the form fit your nail tip tightly. Push the tip edges of the form together so they keep the curve better. Move your fingers so you can see what positions push the nail against the form better, so you can keep that position in the oven later on. If there's a small gap, it's not the end of the world, it will just leave a small ridge under the finished nail. It doesn't show and there's bound to be a tiny ridge anyway.
 |
| Nail forms on. See how they fit differently on each finger? |
 |
| The forms are not very tightly following my nails' curve at this position, but if I flex my fingers straight, they fit much better, |
 |
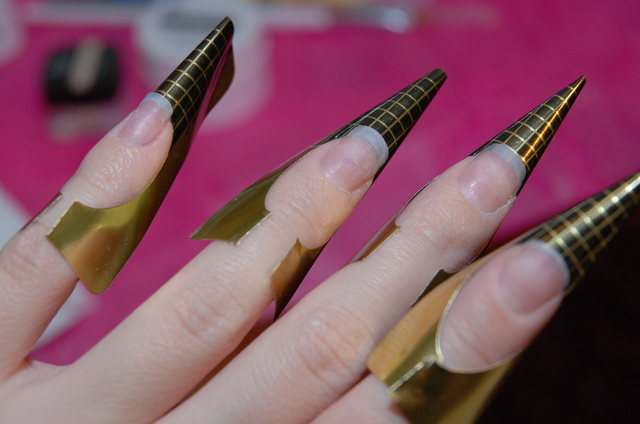
| A view from the front. The forms stick together at the tip so they keep the curve. |
4. Add gel. Paint the UV-gel with a brush on your nails and continue on the forms. There's a grid to help you make your nails roughly the same length. Don't worry if the gel doesn't go on neatly, you'll do more layers and file the nails to form later. Concentrate on getting gel on the edge of your natural nails, so the seam will be strong. Cure gel in the oven.
 |
| Going to the oven! You can see the first layer of gel is not even, but it will be covered with more layers later on. |
 |
| My nail form doesn't fit perfectly and there's a bump between the natural nail and the tip. I'll just add a drop of gel to cover it. |
5. Do 2-4 layers of gel (curing them in the oven) depending on how thin your layers are. Your tip should be quite sturdy before you take the forms off. I always rather do one layer too much than one too little, after breaking a few carefully done tips when taking forms off I've settled for thicker nails. The form of the nail doesn't have to be perfect yet, just make sure the surface doesn't have huge bumps and pay attention to the nail edges near where the gel tip starts, it's easy to miss tiny gaps there. You should make the tips a bit longer than what you want to have in the end, so you have room to file off any wonky edges.
6. Take off the nail forms. I've found that the best way to keep your new tips intact is to nip the forms in from the edges so they will pull down gently. The picture explains it better!
 |
| See? Just push the form edges together starting from the tip until it comes off. |
7. Wipe your nails with cleanser and file them in to shape. As you can see on the picture, the edges look pretty weird at this point! Define the shape you want and file the nails to the desired length. If you spot any gaps, you can still fill them, because there will be more gel layers still.
 |
| Wonky edges? No worries! |
 |
| Filed nails. |
8. Do one or two more layers on the nails to strengthen them. Fill any gaps you might have found. If you have some bumps or spilled gel, you can file it off. Check the nail length and shape.
 |
| If the gel is too thick on the edges, you can file them down. Also any weird holes or spikes that can snag on clothes should be filed down. |
 |
| The cuticle-end of the nail can also be filed, I sometimes get too thick a layer of gel there and just file if in to a prettier shape. |
9. Wipe your nails with cleanser and you are done!
Add regular nailpolish or the UV-gel topcoat. Gel nails resist acetone, so you can use nailpolish remover on them just like on your own nails. If a nail pops off and you are in a hurry, you can glue it back on with false nail glue. It won't hold on forever, but you'll get a few days of wear out of it. The glue can be removed with acetone, so if you will remove the polish you have on, be careful not to get any on the edges of the glued on nail.
You can also use this method to do just one nail, if you have long nails and break one.
 |
| Here are mine after washing all the dust from filing off! |
Edit: I've had to shut down comments due to large amounts of spam. Please feel free to send me any questions to other posts or via email :)


I want to do this to my nails. =o
ReplyDeleteFantastic tutorial!
ReplyDeleteThank you! That was a big help after getting a nail kit and not sure what the nail forms were for!
ReplyDeleteGuess what, I had the exact same problem! :D I had ordered a kit and there were these weird foil stickers. Luckily I came across how to use them in some tutorial or another, and found them to be really useful. I hope you like yours as much!
DeleteThis was very helpful, thnx!
ReplyDeleteTried this for first time. Had acrylics and they ruined my nails. Cut them low and did these using red carpet base coat for the extensions. It worked great! I tried the Idb builder gel and it wouldn't harden so tool a chance on just using the structure base coat and the foil forms. It worked great and definitely is supporting my acrylic damaged natural nails and I did them at home!, so happy,,
ReplyDeleteWhere did you buy your kit from?
ReplyDeleteWhere did you buy your kit from?
ReplyDeleteMine is from eBay, there's lots of kits around. My advice would be just to make sure the oven has high powered lamps, everything else is down to personal preferences!
DeleteObviously you are not trained for this. You should NEVER glue the nails back on if they fall off. It's full of bacterias and can cause infections. Jesus. And pure acetone? Do you want to dry your nails out completely or what?
ReplyDeleteI'm not trained, you are right :) I don't believe a healthy nail can generate an infection from using glue on it, no matter what you glue on it. Gel nails should never be done on nails with wounds on them. Pure acetone is what cleanser for wiping off UV-gel residue is made of.
Delete