Pages

Showing posts with label How to. Show all posts

Sunday, 12 July 2015

How To Make A Victorian Bustle Skirt - The Easy Way

I'm very proud of my Victorian bustle skirt. It wasn't very hard to sew, so I want to share my self-made pattern and the basic instructions, so others can enjoy this lovely type of skirt!


What you need:

5 meters of fabric of your choosing, preferably something that drapes nicely. I used taffeta.
4 meters of plain cotton ribbon. Can be any color, it won't show!
A short zipper in matching color. Mine is 22 cm long.
A button, hooks and eyes or a snap button for the waistband
Sewing machine
Needle and thread
Chalk to draw on the fabric
A piece of plain white paper
Iron and an ironing board
Plenty of pins
A dressform or a friend to help you

Please note that to get the best silhouette for the skirt, you should have a long tulle petticoat and a bustle cage. Both are easy to make yourself, and can be used with many long skirts for added fullness. Petticoats are not expensive to buy either. I made the bustle cage myself, here's a post with pictures of it and a link to the tutorial I used. Before this, I was using a simple pillow to get the effect and it worked nicely too, so you can take a shortcut here if you want!

If you want to wear the skirt with a corset, you should use the corset as an undergarment so you can get the bustle to sit at your natural waistline. It's basically down to what sort of silhouette you prefer, but having the bustle start at the natural waist accentuates the waist, and makes you look taller than with a lower bustle position. Wearing a corset on top of the skirt also flattens your bustle. The best bodice to wear with this type of skirt is a short one that flares out at the natural waist. My bodice is sewn with a Truly Victorian pattern you can find here. The main thing that makes the bodice work perfectly is the little pleated tail that gives plenty of room for the bustle.

For fabric, the best ones are fabrics that have a shiny surface, like my taffeta, so the millions of little pleats and ruffles show well. The fabric should not be very heavy, because there will be a lot of it.

I drafted the pattern based on a bustle skirt I own, made by Fan + Friend. The pattern is not exactly the same, but the general structure follows that of the Fan + Friend skirt. They had done the bustle a bit differently and had a decorative ruffle on the sides of the bustle, for which I was way too lazy.

The red lines mean the folded side of the fabric. Etu is front and taka is back. Turn. is the bustle part and the unmarked piece is the front side of the upper skirt, the pleated apron. The main thing is to have plenty of fabric, so if you are in doubt, rather cut pieces too large than too small. You can always pleat the excess fabric on some seam or another. In addition to these pieces you need a waistband that is the measure of your waist (or corseted waist if you plan to wear the skirt with a corset) + 3 cm, and fabric for the pleated ruffle at the bottom. My ruffle is 9 meters long and 15 cm high.
Basically the skirt has an underskirt with a pleated ruffle about 12 cm tall and an upper skirt consisting of a pleated apron and a bustle that's gathered on five cotton ribbons hanging from the waistband. There's a side zipper that's sewn on both upper and lower skirt, and a waistband that has a snap closure. For more comfort in crowds, there's a loop of matching satin ribbon sewn on the underside of the train so it can be lifted up by putting the loop on your wrist (thanks to Kerttu for adding this last minute!).

An important thing to note! Make sure you take into account the shoes you plan to wear with your skirt! I wanted to wear heels, but mistakenly measured the hem to sit right on me with no shoes on. This way, the skirt ended up being too short with heels on, so I ended up having to take apart the whole waist to add some fabric to the skirt. Naturally I only noticed this after I had the whole skirt finished.

I did some adjustments and fixes while making the skirt, so my process was not as straightforward as it could be. I don't have pictures of all the steps but I'll do my best to explain each one.

The skirt consists of six pieces: upper skirt front (the apron), upper skirt back (the bustle), underskirt front, underskirt back, underskirt hem ruffle and the waistband. The picture below shows the pieces on a finished skirt.


First, lay your fabric on a flat surface, fold it in the middle and draw the pattern on it using a measuring tape. Cut the skirt pieces and a waistband, but don't cut the pleated ruffle yet.

The Underskirt

1. Sew the side seams of the underskirt but leave room for your zipper on one side seam.

2. Iron the waistband so you can pin it on your dressform. If you don't have a dressform, have a friend help you and use pins to secure the waistband on yourself. If you have certain shoes in mind that you want to wear with the skirt, put them on so you can measure the hem to be the right length.

3. Pleat and pin the underskirt on the waistband. Put most of the pleats on the sides and back, you don't want extra bulk on your stomach area.

4. Check the length of the hem. If you have the skirt on a dressform, double check that the dressform in set to the height you will be with the shoes you want to wear with the skirt. Choose how high you want the pleated ruffle to come and, if needed, cut the hem so that it has an extra 1-2 cm for attaching the ruffle. On the front side, the hem should just touch the ground when the ruffle is on. If it's longer, you will trip on it when walking. And trust me, you don't want to shorten the ruffle, so be careful with the measurements here.

5. Cut the fabric for the ruffle. I made a 15 cm high ruffle and pleated it in alternating sections of 5 cm and 2 cm. Some people prefer box pleats for a symmetrical look, but I took the easier route and did just regular pleats. For my pattern, 9 meters of unpleated fabric was enough for the hem and a little piece was still left over. I suggest ripping the pieces instead of cutting them, that keeps the height exactly the same for the whole piece.

Tip: If your hem is not the same length as mine, but you want to use the same 5 cm pleats with 2 cm of fabric folded under the pleat, you can calculate how much fabric you need when you know that 60% of the length of the unpleated fabric will be the length of the finished ruffle. So 5 meters of fabric is 3 meters of pleated ruffle, 10 meters is 6 meters of finished ruffle and so on.

6. Sew the fabric for the pleats so that you have one continuous piece. Finish one edge, either with zigzag or by folding it. Iron for best results.

7. Iron and pin the pleats. Take your piece of paper and fold it in the pattern you want your pleats to be. For easy ironing, you can use the paper as a guide for the fabric. Just tuck the fabric in the folds of the paper and iron over it all. Pin the pleats into place an iron again without the paper to make sure the fabric gets enough heat to keep the pleat well. Move on to the next section and repeat. Make sure to pin the raw edge that will be attached to the skirt, not the finished edge. This is the most time consuming and boring part of the whole process, so stay strong! When the pleats are done you have done most of the work.

Tuck the fabric into the folds of the paper, iron and pin the pleats in place.

8. Sew the pleated edge of the ruffle to secure the pleats.

9. Pin the ruffle to the hem of your skirt. Try the skirt on or try it on the dressform at this point to make sure the final length of the hem is correct. If it's not, you can shorten the hem by attaching the ruffle higher, or add length by sewing an extra strip of fabric on the waist edge of the underskirt. Once you are happy with the length, sew the ruffle on. I found it easiest to hide the seam in the ruffle by placing it on the side of the skirt but it's not very noticeable anyway, so don't worry if the seam is somewhere else.

10. Carefully take the waistband off the underskirt but pin the pleats you made to the skirt edge so they stay put. Sew to secure the pleats. You underskirt is now done!

The Upper Skirt, or Bustle and Apron

1. Cut six pieces of your cotton ribbon. Pin them on the top side of your underskirt in the following pattern: 1 on the center back, 1 on the side where there's no zipper, 2 side to side to the side that will have the zipper. 1 to each side on the back between the side ribbon and center back ribbon. You will gather the side fronts of the front part of the top skirt, and the bustle on the back of the top skirt on these ribbons. If you have a very full figure, you might want to consider adding a few extra strips of ribbon, if it looks like the ribbons are very far apart. The closer the ribbons on the back side are to each other, the tighter and basically fluffier your bustle will be. See the picture below for how the ribbons should lie on your underskirt.

Cotton ribbons pinned to underskirt, seen from the back.


The length of the ribbons is up to you. On the sides they dictate how low the pleated sides fall and on the back you can gather the bustle as low as the ribbons go. A a general guideline, since cotton ribbon is cheap, leave it long so you can cut it shorter later when you can see how the pleating looks.

2. Pleat the front of the upper skirt. Pin the waistband on the dressform and pin the underskirt on it. If you don't have a dressform, put it on yourself and have a friend do the pleating (or the other way around if you are roughly of the same size). Take the piece of fabric you cut for the front part of the upper skirt. You can finish the edge of the piece now if you feel confident that the length is right. If you are not sure, pleat it first and see how it looks, cut if needed and finish the edge last.

Once you have the underskirt on a person or a dressform, locate the cotton ribbons you pinned on the sides. Pin the top edges of the front piece of the upper skirt to the ribbons so you see how wide you finished apron should be. Sandwich the ribbons between the upper skirt and the underskirt. Pleat and pin the top of the piece, once again concentrating the pleats on the side area rather than on the center where they would make you belly look fluffy. Now you have the width of the front part of the upper skirt (=apron) mapped.

Pleat and pin the sides of the apron to the ribbons on the sides. These pleats should fold upwards for the best look. There's no one best size for the pleats, try what looks best to you, just pleat and pin until you are happy with the look.

Ribbons lay on the back of the underskirt.
The front of the upper skirt is pinned to the
waistband and pleated to the side ribbon.


3. Sew the front piece's pleats. Carefully unpin the ribbons from the underskirt and the upper skirt from the waistband, preserving the pleats. Sew to secure the pleats and make sure to catch the cotton ribbon when sewing the side pleats. The edges will be sewn together with the back side of the upper skirt, so don't worry about finishing them yet.

4. Sides of the bustle. Once again put the skirt on your dressform, yourself or a friend. Pin the pleated front piece of the top skirt on the waistband. Make sure you have the cotton ribbons pinned on the underskirt: you should have one in the center back, one on the side where the zipper will be, and two between the sides and the center back.

Take the piece you cut for the back of the upper skirt. Pleat and pin the top edge so it matches the underskirt. Now you want the pleats to be mainly in the center so you will have plenty of fabric for the bustle. Sew to secure the pleats and pin the piece back on the waistband, sandwiching the ribbons between the upper skirt and the underskirt.

Start work on the bustle by pleating the edges of the back piece to match the sides. These pleats should face downwards, not upwards like on the front part. Pin the pleats to the free cotton ribbon on the side where the zipper will be, and straight to the edge of the front piece on the side where there is no zipper. Try what size of pleats work best for you, the general rule is that there can't be too much fabric!

Front of the upper skirt is pleated and sewn to the side ribbons.
The back of the upper skirt (the bustle) is pleated and pinned to the
side ribbon.

5. Sew the side pleats. Sew the pleats to the cotton ribbon on the zipper side, and sew the back piece of the upper skirt to the front piece of the upper skirt on the side where there is no zipper. Put the upper skirt back on your dressform to continue with the bustle.

6. This is the creative part! You aim is to gather the bustle to the cotton ribbons. Use pins to see how it will drape, and when you are happy, attach the fabric to the ribbon with a few hand sewn stitches. There's no rule to how tightly you should gather or in how many places the fabric should be sewn to the ribbons, just pin and see what you like. I suggest wearing your bustle cage / other padding / pillow, and a petticoat to see what the silhouette will be like with the undergarments you plan to wear with the skirt.

The cotton ribbon lies flat on top of the underskirt.
The back piece of the upper skirt is gathered on the ribbon to
create the bustle. The picture shows only one ribbon, but the
finished skirt will have three ribbons done with the same
technique.

When you have gathered the bustle, finish the edge of the piece. If you have extra energy or are just a little bit off in the head, you can add a ruffle to the bustle edge too.

7. When you are happy with the bustle, move on to the boring part. Take your zipper and sew it on so that it's attached to both the upper skirt and the underskirt. (Google for specific zipper instructions, I suck at them!) Sew the rest of the side seam on the upper skirt.

8. Pin the waistband on to make sure it fits. I prefer a waistband that folds over so I can hide all of the ugly unfinished top edges inside them. All that matters is that you have a sturdy waistband that closes securely with a snap or hooks and eyes or a button. No one will see what's under it anyway. If the waistband doesn't fit, check if the problem is in the band or in the skirt. If the band is too long or short, shorten it or cut a new one. If the skirt is too wide for the band, just add a few pleats somewhere to make the width fit. Make sure to have a 3 cm overlap on the waistband for the closure.

When you are happy with the fit of the waistband, sew it in place, making sure you catch the cotton ribbons so they take the weight of the bustle and the pleats. Add the closure type you want (snaps are easiest if you ask me!) and you are all done.

9. Put your new skirt on and admire yourself in the mirror. You did it!

The instructions are quite long but the process itself is not very complicated. Just two skirts with one side zipper, and the top one is pleated at the side seams and gathered on ribbons in the back. Here's some more picture to help you with the details!

Underskirt with ruffle in place.
This side of the skirt has the zipper, but it blends in nicely.
Me, Jukka and Nina. Jukka took most of the pictures of the outfit, thank you! The pleats on the side of the bustle show well in this picture, and also how they are made in a different direction than the pleats on the sides of the apron.
Here I have the train held up with a loop of satin ribbon.
In this picture the pleats on the apron are going the wrong way.
The bustle gathering shows well.
Detail of the bustle.

Wednesday, 31 December 2014

Karoliina's Guide to Glitter - Glitter Eyeliner with Lash Glue

New Year is coming, so I spend some time perfecting my skills with applying glitter. I did a super glittery look and took pictures for tutorials, so here's how to apply glitter as eyeliner with lash glue!

Glitter! On my brows, as liner and on my lips.

First I put on foundation, concealer and powder to prep my face. I added a very subtle smoky eye just to contour the eye area a bit. You should always wear at least a nude eyeshadow to prevent liner transferring to your lid, especially if your eyes are hooded like mine.

Glitter liner works with many looks, but a dramatic smoky eye gets an extra kick out of colourful glitter liner! Do any eyeshadow look you wish first, then apply glitter. Leave mascara to be applied after the glitter. If you use false lashes, add those last, after the glitter and mascara.

You need:

Water proof gel liner and a brush to apply it with (preferably liner in a color that matches your glitter, but plain black also works)
Lash glue and a brush if it doesn't come with one
Fine glitter
A small brush to apply glitter with, I use a soft lip brush
A plate or a palette
Fan brush or other soft, large brush

Inglot gel liner
1. Apply gel liner. The line you draw will be your guide when applying glue later. It will show through the glitter, so make it crisp and neat. Let the liner dry. I used teal liner and glitter that has teal and purple particles so they match nicely.


2. Get your lash glue and glitter ready. Sprinkle some glitter on your plate or palette so you can easily pick it up with a brush. If your lash glue has a brush that can do precise work, use it. If not, get another eyeliner brush ready. Make sure you have the glitter on the palette, the glitter brush ready and grab your lash glue.

I use latex free glue by Revlon that comes with a brush and dries very fast. If you have latex glue, it dries slower and you have some time to work with it, so it's not a disaster if you run out of glitter or drop your brush. With the latex free stuff you need to be fast!

I'm using Darling Girl Cosmetics glitter in Kaleidoscope. It's very fine so it won't irritate your eyes. Don't use craft glitter, it
can really hurt if you get it in your eye!
3. Apply lash glue on top of the gel liner. Grab your glue brush and gently apply a thin layer of glue on top of the line you drew with the gel liner. Do one eye at a time so the glue doesn't dry before you have time to add glitter!

I'm allergic to latex so I use Revlon Precision to glue on lashes and other things.

 4. Pat glitter on the glue. Take a clean brush and dip it in the glitter you sprinkled on the palette. Then pat the brush on the glue you just brushed on. Don't press hard, the glue will pick up the glitter as soon as it touches, the brush is just there to help you place the glitter. Glitter will only stick to the glue if you primed your lids with eyeshadow first, so don't worry if you miss the glue streak. Pat, pick up glitter, pat, and repeat until you feel the brush no longer sticks to the lid. That's when you know the glitter has coated all the glue it can. Don't worry about glitter falling on your cheeks, we'll fix that later!

I use a small, soft lip brush to put the glitter on. The main thing is that the brush is small but still a bit fluffy, not pointed, so it picks up much glitter and can transfer it to a large area. If patting on glitter feels uncomfortable on the lid, your brush might be too stiff.

Pat, pat, pat!
 5. Clean up. Because you put on foundation and powder first, you skin is not sticky and the glitter fall-off can be just brushed away. Use a large, soft brush to gently swipe the loose glitter away. The trick is to use the brush very, very lightly to avoid pushing the glitter against your skin so that it could stick. Do light swipes until you are satisfied. Usually a few glitter particles always remain, but when you use very fine glitter, they are not very noticeable.

Swipe, swipe, swipe!
And you are done! Apply mascara and false lashes if you want to and enjoy. Fine glitter stays well on the glue base so it won't be in your eyes or on your cheeks later in the evening. To vary this look, you could do a line with black first, and the just above it add a coloured glitter line!


6. Removal! Use an oil based make-up remover to wipe off any loose glitter and gel liner. Use a cotton pad folded in half to gently scrub off the glue. It helps if you keep the skin tight! Just place you finger next to your eye and softly pull the skin towards your temple to make it taut. Don't use force when scrubbing, just repeatedly swipe over the liner so the glue starts to roll off. If you got some on your lashes like I did, you need to squish your lashes between two fingers and gently pull out the glue. Washing the eye area with warn water helps the glue to become soft.

Thursday, 11 December 2014

How To Add Ankle Straps To Heels

I like heels, but I don't want to spend that much money on them. The problem with cheap heels is that they are made of plastic, which doesn't really conform to the shape of your feet. This can make then quite uncomfortable to wear. What I did was to buy these lovely spine heels in a size that I knew was a bit loose on me, so they wouldn't squeeze my poor feet, but that meant they don't stay on that well. Solution? Ankle straps! Here's how to make them!

Here's a link to where I got my pair on eBay. The delivery to Finland took a few weeks, but the shoes arrived well-packed and were just like described in the description.

You need:

Ribbon in a colour that matches your heels for attaching the straps
Fabric that matches your heels to make the straps
Velcro
Heel grippers (optional, they make the heels fit more tightly and give a nice finish to the attachment)
Sewing machine
Scissors
Needle
Thimble

Finished heels with ankle straps.
1. Make the straps

Measure your ankle and add about 5 cm to the length to find out how long your straps should be. I made mine with PVC folded and sewn on both edges. I didn't finish the ends because PVC does not unravel, but if your fabric does, fold the ends on the inside of the strap and sew to secure. You can also use for example wide satin ribbon for the straps. If sewing is not your thing, use fabric glue. 


2. Add velcro to your straps

Take you two straps and try them on. They should have 5 cm overlap. That's where the velcro will be. Check how you can make them symmetric and choose to use the side that looks the best as the outside. To keep your straps from tangling on each other, plan the closure to sit on the outside of the ankle, with the overlapping part of the strap on top pointing towards the heel of the shoe. Cut the velcro to have about 4 cm piece on each strap (of both sides of the velcro, naturally!) and attach it by sewing a rectangle in straight stitch. Note that the different sides of the velcro (the scratchy and the soft one) go on different sides of the strap, not just different ends. It doesn't matter which side of the velcro is on top and which below.


3. Sew ribbons on your heels

Make two loops of ribbon. Each one should be large enough to let your strap pass through and then have 2-3 cm extra "tail" for attaching the loop to the shoe. Sew the tails with a zig zag stitch. Take your loop and sew each to the seam on the heel of a shoe. Make stiches only on the seam to hide the alteration. The seam is also the softest part, but you should still use a thimble, the heel part is very tough! If you have trouble pulling the needle through, try suing pliers. You don't need many stiches per shoe, but it's hard work.
I used black velvet ribbon for attaching the straps to the heels. It's soft, easy to sew and with black heels anything black matches well enough.
4. Add heel grippers

Heel grippers are basically leather sticker that fit the inside of the heel of the shoe. They make the heels fit more snug, but in this case they also help to hide the ribbon you sewed on the heel seam and attach it more securely. Stick them on the inside of the shoe according to the instructions, just leave the ribbon ends under the grippers.

5. Put your straps in the loops

Check which strap is for which foot and wiggle them through the ribbon loops of the corresponding shoes. Ta-dah! Heels with ankle straps. If your straps are too loose, just take the strap out of the loop, cut the stitches securing one piece of velcro, re-attach it to a better location and sew it in place. The loops allow you to modify the straps as much as you like without you needing to keep the whole shoe out of the way when you sew.

Sewing the ribbons on the heel seams keeps the shoes looking nice and posh.

Thursday, 24 July 2014

Inspired by Daenerys' Qarth Dress from Game of Thrones

I wanted a fancy dress for an upcoming convention and ventured into the realm of cosplay. I browsed pictures and read tutorials, until finally I could decide what I wanted: a full-on cosplay costume was not to my liking, but I would do something inspired by one of my favourite characters and one of her prettiest dresses. My chosen one is Daenerys Targaryen from Game of Thrones, and the dress is the one she wears in Qarth in season 2. I loved the flowing chiffon dress, but the colours would have been hard to wear again, and I was after something that I could re-use as a part of a different attire. So instead of turquoise and gold my dress is made of black fabric with silver accents.

That's 8 meters of chiffon, a long black underskirt, 3 euro necklace from the flea market
and about 20 sticks of hot glue painted with a silver marker ;D


The attached cape in the back is going to be the death of me when someone steps on it!
The dress is not a replica but inspired by the dress from the show, so I used a lot more fabric, sheerer chiffon and did the back differently. There's much more fabric in the cape part than was on the show!

Here's a shot of my first shoulder pieces. I had to re-do them because I didn't
think they could hold the full weight of the gown.

Here are links to some of the resources I used:

Belt and shoulder patterns by BrittanyDanielleCosplay (I made shoulders based on these patterns, but had to re-do them later. The pattern is super nice and crisp!)

The link below does not work anymore, sorry! The basic idea in the pattern is to measure your body from shoulder to floor (or if you wish to wear heels, take those into account), remove 4-5 cm for the tulle shoulder pieces and add another 5 cm if you plan to wear it with a belt, and then cut four full width pieces of in this length. Works with both 150 cm wide and 112 cm wide fabric, as the dress is heavily pleated.

Two pieces are for the front and two for the back of the dress. For the cape, I used what was left of my 6 meters, but you can just measure where you want the train to end and use that length. I'm 167 cm tall to give you an estimate of how much you should add or reduce! There will be a seam at the center front, center back, but the cape pieces are not sewn together but just freely flow from the shoulders.

How To Make A Daenerys Qarth Gown by I Do Things I Love (I used the basic pattern, but my fabric was 150 cm wide instead of the 112 cm that she has. I also skipped the elastic waist and made a full length back piece instead, and made the front pieces 10 cm longer so I can wear the dress with heels. The pattern is made for a 167 cm tall person, which by chance is exactly my height!)

Daenerys' Qartheen Dress by MisfitToy (I liked this belt pattern the best, I made my template using her pictures)

My dress has a fancy hot glue belt and shoulder pieces. It has almost 8 meters of black polyester chiffon, which by the way is a bitch to sew. I somehow forgot at the fabric store that I HATE sewing chiffon. The chiffon is so sheer that the dress needs a slip or undergarments that hide all critical spots. Using a less sheer fabric would be a good option.

My main troubles were with attaching the shoulder pieces to the dress. The fabric is so heavy that I felt the hot glue filigree pieces might not be able to support it. My solution was to hide a strip of white tulle under each shoulder piece. The "metal" is attached to the tulle with glue and the fabric is sewed to the ends of the tulle strips. I think this might also help make the dress more comfortable to wear when the shoulder pieces are not digging into your shoulders.

This was my other problem: Magnus the kitty is crazy for fabric trailing on the floor, he constantly attacks my hems!

See? What little menace ;P

How to make a Daenerys Qarth Dress (quick tutorial)

You need:
8 meters of fabric
Tiny strip of tulle
70 cm of satin ribbon
About 20 sticks of hot glue (with the small sized sticks)
Hot glue gun
Parchment paper
Tape
Paint marker in the colour you want your filigree pieces
A long necklace
Jump rings and pliers or tread


1. Buy fabric and cut it to pieces according to the pattern.

2. Sew all the edges so they are neat. A self hemming foot is great for this, even if the tulle constantly tries to escape it.

3. Choose a pattern for your shoulder pieces and measure their width. Pleat the top parts of the front pieces and the cape pieces to match. If you have a back piece, make a few pleats on its top corners too just to blend it in. Sew the pleats.

4. If your chiffon has tiny pieces of thread sticking out at the seams, burn those by bringing the edge close to a flame. If you are using a non-synthetic fabric, skip the burning!

5. Measure the length of your shoulder pattern and cut two strips of white or skin-tone tulle that are the same length and a little bit more narrow than the shoulder pieces.

6. Sew the pleated pieces to the tulle strips. Front pieces are simple, just pin the tulle to the pleated parts on the back side of the fabric and sew. I used a zig-zag stitch. For the back, sandwich the tulle between the cape and the back piece, pin and sew.

7. Try the dress on and mark where you want the front pieces to join and where the arm holes should end. This is easiest to do with another person so you can let your arms down so the dress lies like it will when you wear it. Or you can put it on another person, no matter their size. I asked my other half to stand still for a moment and he's a bit bigger than me ;D

8. Sew the front and side seams. Don't worry if the dress is a bit too long for you at this stage, wearing it with the belt takes off a few centimetres of the length. At this stage it looks like a sack made of chiffon anyway.

9. Choose your belt pattern, print it out and tape it to a surface that can stand a little heat. Make sure to scale the pattern to work with your waist measurement. If you use a thicker fabric than chiffon, take into account the bulk it will add. In my opinion the belt looks best when it is slightly open in the back so just be careful not to make it too big and you should be fine.

10. Trace the belt pattern with hot glue. You should do the upper and lower edge as one long strip to make them durable, and then fill in the middle part. Remember to make hole-like pattern to the place where the belt closes in the back so you can thread the ribbon through the holes later. For stability, I added wider straight lines of glue next to the holes to act as light boning to keep the back from warping.

11. Repeat steps 9. and 10. for the shoulder parts.

12. Colour your filigree pieces with the marker. If it leaves a sticky surface after dry (my marker took about 15 minutes to dry, while drying it did feel sticky), you can add spray varnish on top. Spray paint should also work. I painted my pieces only on the top part that shows, just in case the colour might rub out and stain the fabric.

13. For that extra finishing touch, iron the dress. Pay extra attention to getting all the pleats to lay flat so they don't puff out and make the silhouette less sleek. Don't leave ironing until later, you can't iron the shoulder pleats once you have attached the hot glue pieces!

14. Put on your dress and check the positions for the shoulder pieces. Their ends should come on top of the pleated edges of the fabric for 1-2 cm. Use a few drops of hot glue to make them stick to the tulle or your fabric (whatever is best for positioning them the way you like) and sew through the hardened glue for extra security.

15. Take your long necklace and attach it to the bottom edge of your belt. For a screen accurate look, cut it in half and let two long cords hang from the belt. I liked a draped look more, so I didn't cut mine. Attach it with jump rings and pliers, or just with some tread in a matching colour.

16. All done! Put on the dress and admire yourself :)

Having chiffon under the shoulder pieces lets them rise a bit from
the shoulders, which I think looks really nice. It also means there's
not much stress on them.


The cape is separate from the back piece, so it flows freely.

Saturday, 3 May 2014

How to Take Good Outfit Shots

I was trying out my new camera with my other half as the photographer. We took a few pictures to show what lenses you should use and how when taking outfit pictures.

General tips for posing
  • Stand up tall
  • Turn your face towards the light source if you can see one
  • Keep your chin up!
  • Crossing your legs makes your silhouette slim
  • Hand on your waist accentuates the waistline nicely (work especially well with heavy coats like the one I'm wearing in the pictures below)
And for taking photos
  • Find a background that's not too busy, repeating patterns like wallpaper are good and plain walls the best
  • Hold the camera below eye-level, but waist-level at the lowest
  • If your camera has a zoom function, zoom out as far as you can to avoid distortion
  • If natural light is an option, go for it!


Picture number one: Taken with the camera lower than eye-level with the basic 14-42 mm kit lens of an Olympus Pen zoomed out as far as it goes.

Results: Not much distortion thanks to the lens. Holding the camera lower than eye-level helps reducing the "bobble head" look, most noticeably making legs look longer.


Picture number two: Olympus Pen with a 19 mm Sigma lens, held a little lower than eye level.

Results: Much like above with the 14-42 mm lens zoomed out. No distortion and nice proportions.


Picture number three: Olympus Pen 14-42 mm lens zoomed in, camera held at waist level.

Results: Visible distortion, legs look short and the waist area is thicker. If the camera would be at eye-level, it would result in a bobble head look with a huge head and tiny feet.

Saturday, 26 April 2014

How to Fix Battered Heels

I bought a pair of pink shoes from the flea market. Their heels had some scratches and the top layer of the faux leather had peeled off. Here's how I fixed them!

Starting point: battered, peeled faux leather,
1. Find a nail polish or an acrylic paint that matches

If possible, the finish should also match. For example a black shiny nail polish would work well on PVC, and black matte acrylic for faux leather. I have a pink nail polish that's sadly slightly darker then my shoes.

Shoes and (almost) matching polish.
2. Grab a brush and paint the scratches

With nail polish you can use the brush they come with, but for more precise work, put a drop of polish on a palette (like a piece of a plastic bag, something that doesn't go mushy) and paint it on with a thin brush. For best results, try to get the polish/paint only on the scratches, so it doesn't show on the intact leather. Especially if your polish or paint is darker, it can show on the shoe, like mine did a bit.


3. Let dry well, apply second coat if needed

Give your fixes time to dry thoroughly before you decide if another coat is needed. Some material soak up paint and can appear a lot darker when wet, so you can only see the final result when the polish or paint has dried. Apply second coat only on dry surface to avoid making the previously applied coat roll off.

4. Let dry, enjoy!

Since your shoes are usually a long way from anyone watching, the results don't need to be perfect. Just hiding the most obvious scratches and dents does wonders!

Monday, 10 February 2014

How To Make A Loose Synthetic Hairfall


I like big hair, but it's a pain in the behind to back-comb and then comb out the tangles the next day. That's why I came up with a great way to have the big, back-combed look with less hassle, a loose synthetic hairfall! I made one in purple when I had my previous haircolour, but needed another one now with the turquoise. Here's how to do it.

You need

  • 2 packets or more of synthetic hair
  • Matching colour stretch lace or fabric coated elastic band, about 40 cm or 20 inches (if you can't find a matching shade, you can use black if you hair is dark and beige for light hair)
  • Something to suspend the elastic/lace on or between when you work on the fall
  • Two chairs to lay your hair on while you work


1. Find matching loose synthetic hair

If you have a shop selling synthetic hair close to you, you can go and match your hair easily. If you order online, finding a shade that matches can be harder. I suggest looking at colour charts at more than one shop and googling user pictures if any can be found. For a more natural finish, you should use more than one colour of hair. My fall has petrol green, blue and black. For a big, fluffy style you should use crinkly textures hair like most jumbo braid varieties. Steer away from very smooth hair types.

I ordered my synth hair from Diversity Hair, the shades used are Petrol Green and Blue Teal, the brand is Divesity Hair's own jumbo braid.

How much hair do you need? My fall has 1,5 packs of the base colour, Petrol Green, and about half a packet of Blue teal, and a few strands of black as accents. For a fuller fall you need more, but two packets should be enough when you finish the fall with back-combing.

2. Setup

I took a large basket with handles and tied my elastic to the handles. It's easiest to work when the band is suspended. Open the hair packages and put them on the backrest of a chair, with the middle of the hair bundle on the top of the backrest. Reserve another chair for separating sections of hair from the bundles.

I ended up not using the purple after all. The black I used is not in the picture.
3. Separate sections of hair

Take small sections of hair (half the thickness of a finger of a little bit more) of the colour you want to be the base of the fall. Spread them on the backrest of another chair. Add small strands of a second colour if you want to use one for a more interesting look. I used a more blue-ish teal to make the the shade match my hair better.


How much of the complimenting blue I used per section of teal.
4. Tie the sections on the hair on the elastic

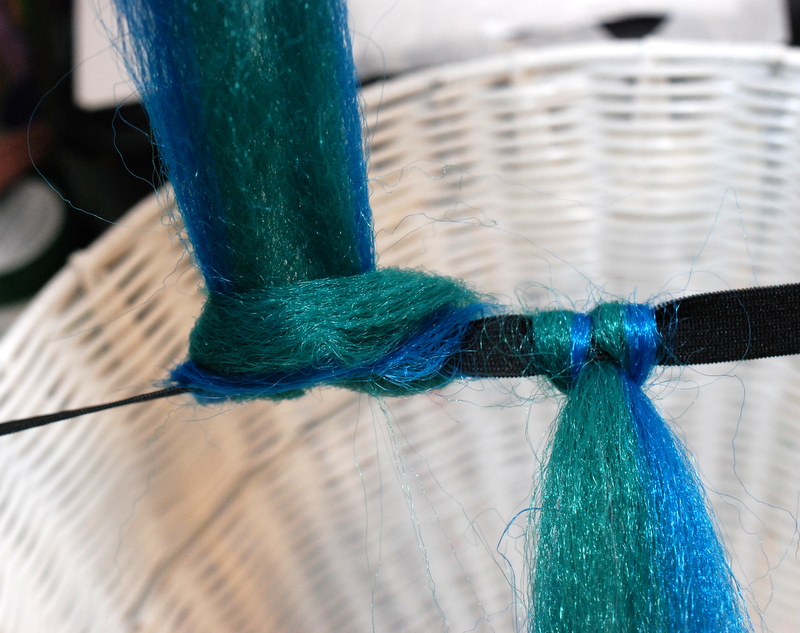
Grab a hair section and fold it gently at the middle. Take the ends of the section and pull them through the loop so that it wraps around the elastic band. The pictures explain it a lot better ;P


Gently fold but make sure to hold on to the loop.

Put the loop next to the elastic band.

Pull the ends through the loop so the elastic is wrapped in the hair.

Pull all the way through...

And tighten!

This is what two sections on the band look.

Here's only one section.
Use up the sections you have made, then separate a new batch of sections from the hair bundles, add some accent colour and tie them to the band. The sections tend to loosen a bit once you have tied then, but don't worry, you will tighten them in a later step.

If you want to use small accents sections on top of mixing two tones, you can add them once you have all the base colour on the fall. Just pick a spot for the accent, find the place where two tied section are side by side, gently pull them apart a bit and tie the accent in the space just like all the other sections.

You should have about 10 cm of loose elastic band on both ends of the fall when you finish. Keep tying sections until the 20 cm in the middle are covered.

This is what my fall looks when there's enough hair on it.

5. Optional: Braid the sections

Some people like to braid the hair sections for a centimeter or two to keep the hair in place better. You can also heat seal the braids with a small straight iron. I don't personally do this step, I think the hair is well enough in place without braiding.

6. Secure the hair in place

If used a sewing machine and a zig-zag stitch to secure the hair on to the elastic. The foot wants to snag on hair, so instead of doing it like I did, I can recommend putting a sheet of paper on top of the hair and sewing on top of that to avoid getting the hair caught in the machine.


7. Back-comb, cut, style!

You are almost finished! Now you can cut the fall and back-comb. I recommend using some sort of styling product to give the hair some texture, I used spray-on gel. If you cut the fall to have layers, it's easier to back-comb to a big, high style.

8. Put it on

This is basically what you have now. A large mass of hair on an elastic band.


Put your hair on a bun, bend from the waist and grab the fall.

Wrap the fall around your bun. Ideally, the width of the fall should be the same as
the circumference of your bun.

Tie the ends.

Tighten, use hair clips for extra security if you know you'll be dancing your ass off!
Flip the hair over the bun, tousle it with your fingers, add some hairspray to keep it in place if needed, and you are done!

This is how mine looks, I didn't cut it yet but I think it's a bit too long right now. It's back-combed lightly. I think the colour match is quite good!


Super easy big hair! You'll be so happy when you come home in the middle of the night dead tired, and instead of trying to comb the hair you can just untie the band and let your natural hair down. No more tedious untangling and damaging your hair! For shorter falls, you can cut the loose fiber bundles in two before starting to make sections or tie them. Or you could make two smaller falls to have cute puffy pigtails :)

Here's a picture of my previous loose fall. It's shorter and more layered. The flowers clipped
at the base are a great way to hide the transition between the fall and your natural hair!
Related Posts Plugin for WordPress, Blogger...