
Naturally, I wanted something over the top and went browsing for chandeliers. It was hard to find anything nice with a decent price tag, and since I like crafts, I decided to just make my own version.
This is the tutorial I used for basis Dollar Store Crafts - Make a Beaded Chandelier
You need:
A hanging basket or a planter, or anything sturdy enough to make a circular frame for the chandelier
Mardi gras necklaces (I used about 80 on a chandelier with 40cm diameter)
Thin wire
Pliers
Satin ribbon
A lamp cord set (the part that has all the electrical thingies)
A low energy bulb that fits your cord (low energy bulbs generate less heat so they are safer than regular bulbs when working with cheap plastic beads)
1. Get the supplies
I started by ordering a ton of cheap mardi gras neclaces (the type that have the beads molded on a string) from Etsy, since it was a pain in the butt trying to find enough of them in nice colours anywhere in Finland. I tried to find a hanging planter, as used in the tutorial, but since it's very early spring, there were none in the shops. So I settled for some wire and an Ikea decorative Christmas light. It was a round carton thing with battery operated light string inside, I pried it open and just cut a circular piece of the edge to use as the middle part of the chandelier. I made the top and bottom circles by glueing the leftover slices of the lamp edge together. Make sure you can fit the light bulb part of the cord set through the smaller circle, or add it there already if the circle will be too small.
2. Make the frame
So now I had one large circle (about 40cm in diameter) and two smaller circles (about 9cm and 14cm). I used thin wire to attach them together so that the smaller circle was on top, largest after it and the medium one at the bottom. You should have about double the distance of the medium and largest circle between the medium and the smallest. It's still easy at this point to make the wires shorter or longer. If you want to make your chandelier extra smart looking, paint the base. I didn't and had some issues trying to hide the ugly white frame pieces.
3. Prep the necklaces
I then cut open every necklace. If you do not need the chandelier to be of a certain size, it's easiest to design it so that one string of beads is long enough to go from the top circle to the bottom circle. This way you don't have to fuse the beads together or do any more cutting.
4. Attach the necklaces to the top of the frame
Start to attach the bead strings to the top circle. Put in as many as you can fit, they can also be on top of each other. The top of the lamp is going to be pretty much hidden when it's in use, so no need to do extra neat job there. It's easiest to work with the chandelier frame when you hang it on to something.
5. Attach the necklaces to the middle of the frame
I just looped the necklaces once around the middle circle edge, so they would cover more of it. You can also just attach them with wire to keep the middle part less bulky.
6. Attach the necklaces to the bottom of the frame
I looped the necklaces around the bottom circle edge and fixed them in place with the thin wire. Some ends were long enough to tie back to the middle circle, so I did that to get it covered better. I let some of the necklace ends hang loose through the bottom loop.
7. Put the cord set in
The light bulb should hang on level with the largest circle. I tied satin ribbon to the top circle and fixed it to the cord with a cable tie. It's not the most elegant of solutions, but it holds well and you can cover it with a bowtie it you want to. It's so close to the ceiling that it doesn't show much anyway. Put the low energy bulb in and attach the lamp to the ceiling. You're done!
Here's pictures of my chandelier. My boyfriend said it really did look like a dollar store lamp, but I like it anyway ;) He'll get used to it!
 |
| You can see my ugly white frame showing through the middle part. |
 |
| The necklaces are put on pretty carelessly, but this is not the angle from which you look at the finished product. |
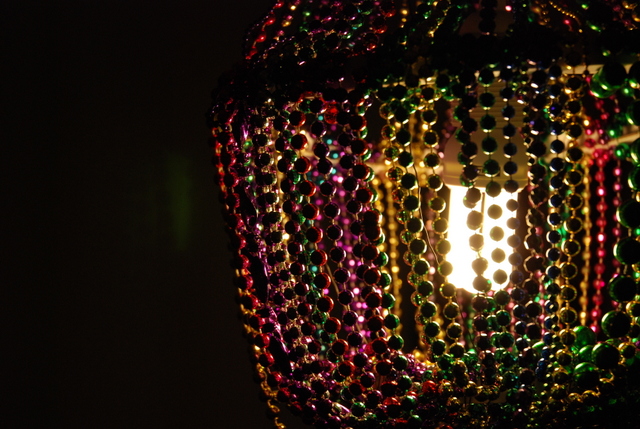 |
| And the lamp in action! I think it goes well with our purple curtains and bed cover. |

This looks awesome!
ReplyDeleteThank you! I put it up and I think it really fits our bedroom well :)
DeleteCreative!
ReplyDelete/Avy
http://mymotherfuckedmickjagger.blogspot.com
♥
Thanks!
DeleteAwesome!! I've wanted to make one but the problem is the FRAME. Where do I get these construction base pieces from? I know I can find all the decorative stuff from eBay.
ReplyDeleteI just made my own frame, if you are using a large amount of necklaces, a thin frame doesn't really show. Mine is a bit too thick and should have been painted black. I think thick wiring would look neat.
DeleteOijoi miten kaunis! Olen äskettäin muuttanut uuteen kämppään, ja kattolamppujen etsiminen on suuuuuri ongelma :) Inspasit kyllä tosi paljon, pitää ehdottaa avomiehelle tällasta ratkaisua!
ReplyDeleteKiva että tykkäsit! Nyt kun on niin helposti saatavilla energiansäästölamppuja, jotka eivät lämpene pahemmin, lamppuja voi aika huoleti tuunata :)
Delete