Pages

Saturday 31 August 2013

Wedding Look, Once Again!

This seems to be the summer of love, I'm once again heading for a wedding reception! I'm in a hurry but just wanted to post a few pictures. I hope I can bribe someone to take a few at the party, so I could show you my cute little hat, too ;D

The eyeshadows are all by Sugarpill, and the lips are done with two shades of Manhattan Lips2Last liquid lipstick. The lips look a bit drag queen like IRL, but I like over-the-top things! Plus I'm DJ'ing at the event, so I'm allowed to look weird. Right? ;)


Friday 30 August 2013

Outfit of the Day

This is what I wore to go out to eat with my other half! Autumn is clearly coming since I'm already planning a costume for Samhain and picked up a new hobby. I booked a few pole dancing lessons since I was so excited about it at the bachelorette party and it felt like an intense workout. I did gymnastics when I was a child and it all came back, I (mostly) remembered to extent my ankles and keep legs and arms straight when doing the moves, and remembered what I liked about that sort of exercise :) As an added bonus the dance studio is right my office, so even if I'm tired it's not a long way to go. I know from experience that I'm rubbish when it comes to getting off my ass and dragging myself somewhere far to exercise! I'm not very sporty, but I'd like to stay in shape, so here's hoping pole dancing will keep me interested!


Dress - H&M
Boots - New Rock

You might notice I also cut my bangs. The slanted cut was hard to keep looking nice since I'm a cheapskate when it comes to going to the hairdressers. I like a cut that I can keep looking nice by doing the maintenance myself. Maybe I'll go for the slanted bangs again next summer, but right now the straight bang feels like me :)


Monday 26 August 2013

Day of the Dead Look with Sugarpill

Here's my day of the dead look from the bachelorette party. I curled my hair with a curling wand, put some clip-in flowers on top of my head and a bone hairpin. The white base on my face is by Grimas (I actually had some bb-cream underneath it, the base was lent) , teeth on my lips are done with an eyeliner and the nose markings are black eyeshadow pen. The colours are Sugarpill pressed shadows which I put on using my fingers because I forgot to pack brushes ;D Except for the eyelids, those are done with brushes.


Sunday 25 August 2013

Dead Babes

Yesterday I was at a bachelorette party, what a fun night it was! We had a Day of the Dead theme, and had a picnic, a pole dancing lesson, a piñata, went on the zombie walk, decorated sugar skulls and had very delicious tortillas and some tequila. Now I'm sore from the dancing and sorting through over 300 photos, but happy.

The piñata, in the shape of a pink unicorn!

That's us!

Friday 23 August 2013

Cake.

This is me looking stupidly happy with a piece of cake. Raspberry cheese cake, that is, that I ate yesterday when my other half and I decided to go out for something sweet. There's a a new-ish cafe nearby that I visited once before and drooled over the lovely cakes, and finally I got to taste one!

It's been a long and busy week, and it's to be followed with a busy weekend, can't wait :)

Cake is good. Eat more cake.

Thursday 22 August 2013

Photoshoot Time!

This time I was on the other side of the camera! My other half and a friend have been working on a podcast called We Are Not Here To Please You, and I promised to take them some pictures. They have a great dynamic, and what I've heard of the show (I was playing Diablo in the study while they recorded things in the living room) sounded really interesting. The first episode is being edited, so it's going to be out soon and I'll be sure to post a link then so you can try it out :) So here they are (not to please you), Arttu and Rafael! The pictures are basically unedited (I just adjusted the colours a bit) because they will be worked on later.


Nana the cat was keeping us company all the time by running around and wrestling with a tiny catnip toy. She sure knew how to keep the mood high! Could be that the Southern Comfort helped too, otherwise we might not have achieved these wacky pictures ;P

Wednesday 21 August 2013

Getting the Most Out of Your Closet or the New Shoe Rack


I had been dreaming of a nice way to store my shoes, and finally got around to making it true. I'd seen a lot of these DYI shoe racks made with crown moulding (kattolista for Finnish readers, I spent ages looking for the right term to google with!) around the net and they looked really neat. I thought about hanging it above my vanity, but the bedroom felt already too crowded. hen it dawned on me that I actually had an excellent spot for one! We have a built in closet that's really a weird shape, it's actually a lot higher that the doors, so there's space left on top that can't be used for shelves. The perfect place for a shoe rack!

So off I went to get some nice crown moulding, cut it to size (after realizing that I had actually returned both of the saws I had lent from my Dad, luckily I had a jigsaw I had purchased for cutting laminate floors for the previous apartment), drilled holes for the screws and then my other half put the on the wall. He's really particular about everything being straight and neat, where I'm more of a person who wants to get stuff finished fast with less than perfect results. That's why he doesn't let me do the drilling, and I'm not so fond of it anyway, so it's a good deal ;D

The silly closet. The space is way higher than the doors, making it hard to use.

One shoe rack in place! There's actually another one higher up, it's the same size, from wall to wall.

All of my shoes didn't fit the rack, because I have wedges, heelless shoes and boots too, but it has room for all of my
small high heel shoes and the top rack is still empty. That means I can buy more shoes, right? ;)

Another tip on stuffing the closets full: I hammereda few nails on the inside of the doors
and hung my bags there. That way it's always easy to pick the one you want to use,
unlike with my previous storage solution which was mainly a pile of bags.

The finished shoe rack with the (bent) clothes rack and my clothes back in place.
The rack was pretty easy to make in the end. The hardest part was drilling holes in the moulding so that it wouldn't break and the holes would be straight(ish, when I'm drilling). I still didn't break anything, just used a short piece for practice. Now the shoes are much easier to browse and are all in one place, I used to have small Ikea shoe boxes stashed around the apartment and it was a nightmare to try and find the right pair of shoes! Now it's just these, then two shoe boxes for wedges and heelless shoes, and a shelf in the foyer for boots. Plus maybe a few pairs stashed in my other half's own closet ;P

Tuesday 20 August 2013

Outfit of the Day

This one is from Sunday, I wore it to the chili fest! Comfy and easy :)


Bolero - Second hand
Necklace - My sister's old
Dress - H&M
Leggings - Seppälä
Handbag - H&M
Boots - New Rock


Monday 19 August 2013

Exotic Bird Look

This one is from last week, I dug up my Sugarpill Heartbreaker palette. It has such great colours, they look a bit boring when alone, but when combined they come to life! The shades always remind me of exotic birds, they are so fresh and vibrant.

The bright acid green on the lower lash line and inner part of the lid is Acidberry, the aqua on the lid is Mochi, the blue is Velocity and the dark pink is called 2AM. I used primer and a Nyx Jumbo Eye pencil in Milk to make to colours come it very bright.


Sunday 18 August 2013

Chili Fest!

Last night my other half's band had a gig, and it was super packed and the place was hot and sweaty, what a tiring night! Today we finally headed out the the Chili Fest that already started on Friday, but we've both been so busy that visiting the fest was left for Sunday. I'm not a big fan of spicy food, but my other half loves it, so naturally I have got to taste a lot of hot stuff.

Tampere is so pretty.


Just look at those colours!


My other half got lots of different sauces, and I picked one that was mildly hot and had plum in it. I'm cooking pork with it, it's in the oven right now and I'm hoping it will come out nice! I also couldn't resist the cute little chili bushes, I bought one (that I first checked was a kind that my other half likes, since I'm not eating the chilies he better be ;P) to just sit on the window sill with my other plants. Currently all of my orchids are in bloom, so I'm feeling super confident about houseplants!


Saturday 17 August 2013

How to Wash Make-up Brushes

I like make-up, so I have quite a collection of brushes to apply it with. I want to take good care of my brushes so they will last a long time, and I still wash them quite often. I never use the same eyeshadow brush twice if I can avoid it, so the loose shadows won't mix and get dirty. And since I don't want to be washing brushes every day, this means I have around 10-15 eyeshadow brushes in use. My foundation brush gets washed whenever I wash the other brushes, blush and powder brushes less often. So far my brushes have held up fine, the oldest one is a blush brush that must be around nine years old, but of the more often used and washed brushes the Gosh eyeshadow brushes must be oldest, they are three years old.


I think quality brushes help apply make-up easier, but it's all down to your own preferences. Some people like to use large, fluffy brushes for the whole eye make-up, other prefer small, stiff, precise brushes. The main thing is that a brush should never feel uncomfortable. If it scratches your skin, it's not for you!

Here's how I wash my brushes, I learned my technique from Luna at Toxid Lotus a long time ago :)

You need:
A clean hand towel
Soap (some people like to use baby shampoo, and it's a good option if you have brushes with non-synthetic bristles. I use leftover hand and body soaps and the tiny soaps you get from hotels.)

1. Prepare the towel

Fold the towel in half and roll half of it. You will lay your wet, clean brushes to dry on it later. If you have many brushes, use a larger towel. Brushes usually need at least 10 hours to dry thoroughly, so pick a spot where they are not in the way during that time.


2. Get ready

Grab your soap (mine is tiny, it's the last piece of a bar from Dreaming Tree, I wanted to use every bit!) and let the tap run. Place the soap on your fingers so you have room to swish the brushes on your palm.
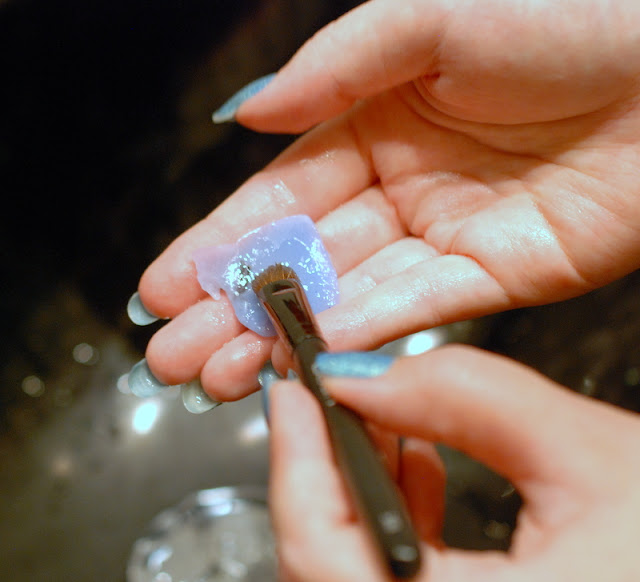

3. Wash!

Wet the brush in the running water, the swipe it on your soap. Swish the soapy brush on your palm to get the soap to penetrate the bristles. Rinse lightly and repeat until the brush doesn't let any more colour.

Wet...

Swipe...

Swish!
4. Rinse

Swish the brush in the running water for a while, make sure to bend the bristles so the water gets everywhere. If you can avoid it, don't let water get anywhere but the bristles and the ferrule, if it goes on the shaft, you might end up with the ferrule coming loose or the shaft swelling because of the moisture (only if it's wood). If the handle looks dirty, wash it quickly and dry immediately with a paper towel, or just wipe with alcohol (hand sanitizer works).

Rinse thoroughly!
5. Dry

Squish the bristles between your fingers to force out most of the water, but be careful not to pull them! Set your brush on the half rolled towel to that it's leaning down with the bristles at the lowest point. This prevents the moisture from the bristles from corroding the ferrule or the glue inside it that keep the bristles in place. Never dry your brushes bristles up, the moisture will only seep down into the ferrule and can even cause the glue to grow mold over time!

Squish gently.

And place to dry. My eyeshadow brushes take around 10 hours to dry, but the time depends on what material the bristles are (EcoTools dry the fastest, they have synthetic but very soft bristles) and how thick the brushes are. Large face brushes take a lot longer!

How to position brushes on the half rolled towel.
If you want the brushes to dry faster, you can try putting paper towel on top of the regular towel and changing it a few times over the drying time. For a quick help, I have Elf brush cleaning liquid that's basically alcohol. You spray some on the bristles, swipe the brush on a paper towel, repeat until no more colour sticks on the towel, and let it dry. Alcohol evaporates a lot faster than water, so your eyeshadow brush will be ready to use in about 15 minutes.

I personally think using quick alcohol cleanser often might affect the glue and dry out the bristles, so I prefer to just wash my brushes regularly and have many of the same brush. I don't use quick cleanser for face brushes at all, because they would still take ages to dry, and the alcohol would have a lot more time to dissolve the glue keeping the bristles in place.
Related Posts Plugin for WordPress, Blogger...