Pages

Wednesday, 7 March 2012

Neutral Look

Today I did a look with neutral brown colours, using only one of the samples I'm trying to work through. Paired with a bold lipstain, I think it looks nice :) Chocoholic is a really red toned warm dark brown, so I put on Envy me with it, which is a taupe with a green sheen. I'm really loving the lipstain, it lasts me through a whole day at work, even with a pasta lunch!

I used:
Fyrinnae Damn Paladins
Fyrinnae Envy Me
Glamour Doll Eyes Chocoholic
Kanebo 38 Mascara
Lumene Sweet Blush
Gosh lipstain Berry


Whoops, wonky bangs!

Tuesday, 6 March 2012

Samples Look

I'm trying to use up some of the samples I've got, so I here's a look done with Glamour Doll Eyes and Darling Girl Cosmetics that I wore to work today (and to a carting track later, when doing some extra work in the evening). I tried to show how I did my hair partly up so my undercut would show, but it didn't look as good on camera. Also my hair conceals my lovely sparrow skull earrings! But I think you can see one if you look really hard.

I used:
Darling Girl Cosmetics LaLa (on whole lid)
Glamour Doll Eyes Glam Girl (in the crease)
Glamour Doll Eyes Phyrra (in the inner corners and on lower lid)


Monday, 5 March 2012

Current Obsessions

I like many things, but here's a few things that are on my mind often lately.

This is not what my basil looks like at all. It's a lot slimmer. And with 3 leaves.
Gardening
I'm not sure if you can call it gardening, since I don't have a garden but only a few window sills and a balcony. Last summer we had lots of green thingies growing on the balcony, and now that all the snow melted off it, I'm already excited over what I could plant this year. I have a basil that looks mostly dead (zombie basil, anuone?) and it might live on to grow big on the balcony, and there's still room in the nice herb planter I got from the fleamarket. My boyfriend also put up a window sill in the kitchen as well, so I can start growing stuff inside and just move the pots to the balcony when it's warmer.

Isn't it pretty? It's pink!
Skulls
I was browsing through interior decoration blogs and wondering why some people like to paint everything white or collect all sorts of old junk. How can they fit into their houses with all that glassware and old pots and coffee tins? I don't collect anything, and stopped to think if I even own anything that purely decorative. I came up with only one item, a purple resin human skull that's painted with purple blackboard paint. I just didn't notice it at first, because it has found it's use and currently holds a silly looking military hat from my other half's collection ;) But remembering the skull helped me to also remember that I ordered it just to see if it's nice, and that I should get it some company! So now the purple skull will have a pink and a grey friend, soon. They are all from this etsy shop.

They all smell nice.
Smellies
I haven't really been into perfumes, I used to own only two and both were bought second hand. I'm a bit sensitive to smells. I've tried some perfumes by the Morbid the Merrier and One Hand Washes the Other but I'm still having trouble identifying which ingredients are the ones I like to smell. I ordered some of the limited edition winter perfumes from OHWTO, because I like earthy smells and was hoping wintery smells would be dark and warm and earthy.


Kate Bush - Wuthering Heights
I had heard the song before and didn't really like it, but a few weeks back a friend showed me the video and told me what the song's about. Since then it has been going on and on in my head. I'm just a sucker for love overcoming even death. I haven't even read the book (or seen any movie adaptations), but I can imagine the ghost of Cathy scratching Heathcliff's window, remembering the love she felt for him and coming back to the home where she lived during the best time of her life.

Organizing
Rather than buying new stuff, I want to get rid of the all the stuff I don't use. I've even sold shoes! Although those losses were quickly covered with new recruits ;P It's a good thing we have one room that's dedicated to crafts and computers, so I can just dump everything that doesn't have a place there. I've already gotten rid of our old couch, two fugly cabinets (that were supposed to go even before we moved here, and that was almost a year ago) and a TV-table. I've also stashed two armchairs and a coffeetable on the attic and have three huge plastic bags full of stuff to donate to the charity, just waiting for the moment when I feel like dragging them down the road to the charity shop. Minimalism is not my thing, but having stuff organized helps me find everything easily and have room to do projects.

Sunday, 4 March 2012

Concrete Minerals Swatches

Concrete Minerals was the first mineral makeup company I purchased from. Back then they sold through Etsy, but nowadays they have their own online store and have more colours and some lip products too. I gathered all my Concrete Minerals shadows and swatched them, I still use them often and like the colours a lot!

Concrete Minerals uses jars with black lids.

Here are pictures of every shadow in its jar. The shades tend to show up a bit darker than in real life.

Sabotage

Lolita

Smut

Jezebel

Kismet

Zealous

Arsenic

Prude

Doe-eyed

Juvenile

Temptress

Croma

Unity

Infinity

From left to right, top to bottom: Lolita, Sabotage, Smut, Jezebel, Kismet, Zealous, Arsenic, Prude and Doe-eyed

Lolita - a light taupe with a metallic sheen

Sabotage - black with multicolored shimmer. Like a toned-down version of Sugarpill Stella, this one is better for everyday wear because it's less glittery.

Smut - A medium taupe with red sheen and shimmer.

Jezebel - A plum purple with some red shimmer. Very usable.

Kismet - A light warm pink with pink shimmer.

Zealous - A very bright turquoise, shimmery.

Arsenic - This is listed a purple, but it's borderline between purple and brown if you ask me. It the same depth as Jezebel, but clearly more reddish and has some shimmer.

Prude - A very light pink, good for highlighting and very shimmery.

Doe-eyed - A warm, dark brown. Matte base with just a hint of matching shimmer. Works well with green eyes, one of my favourites!

Juvenile, Temptress, Croma, Unity and Infinity

Juvenile - A really hard colour to photograph, Juvenile is a light yellowish green.

Temptress - A dark blue-green colour with matching shimmer. Fades to a forest green if blended for long.

Croma - A light lavender lilac matte base with some white shimmer.

Unity - A blue based medium purple with white and gold shimmer. Goes well with Croma.

Infinity - This is a colour I didn't even remember owning. It like a lighter version of Temptress in real life.


I've also had Mad Hatter, but it was very similar to Arsenic so I gave it away, and I got Hearts for my boyfriend. Hearts is a warm, rusty red and he likes it very much. I really like the browns and taupes, Lolita, Smut and Doe-eyed are very pretty and I've used them a lot. I have been satisfied with the quality, and the full size jars are just huge, I doubt I'll ever use one up!

Saturday, 3 March 2012

Weekend Link Love


Here are a few links to blogs from the Meep Moo group from Facebook. We try to share links every week from now on. Enjoy!


Lizzy shares a few items that stole her heart in February at The Nature of Beauty

Luna wants to know what your favorite eye shadow primer is at TOXiD-LOTUS.NET

Jen put together a colorful collection of Meow Cosmetics swatches at The Everyday Opinionista

Karoliina wants to show off a lilac look done with Darling Girl Cosmetics at Bones and Lilies

Orange things piss off Erin at Oh Honestly, Erin

Sharon swatched sparkly goodness from her Fyrinnae stash at Hello There, Blondie!

Stephanie kicks off the second round of Nerd Wars with tiny knitted hexagons of doom.

Claire uses some Brazen colors at Claire's Beauty.

Friday, 2 March 2012

How to Make a Chandelier

Do you have a room that's too boring? I sure did. We had super ugly ceiling lights in the hallway and kitchen, so I was planning to make something better for them, but during negotiations with the person I share the apartment with was very adamant in having no fancy chandeliers in the hallway. So, after some negotiations, we settled for buying new lamps for the hallway, moving the bedroom light to the kitchen and that I could make a new lamp for the bedroom.

Naturally, I wanted something over the top and went browsing for chandeliers. It was hard to find anything nice with a decent price tag, and since I like crafts, I decided to just make my own version.

This is the tutorial I used for basis Dollar Store Crafts - Make a Beaded Chandelier

You need:
A hanging basket or a planter, or anything sturdy enough to make a circular frame for the chandelier
Mardi gras necklaces (I used about 80 on a chandelier with 40cm diameter)
Thin wire
Pliers
Satin ribbon
A lamp cord set (the part that has all the electrical thingies)
A low energy bulb that fits your cord (low energy bulbs generate less heat so they are safer than regular bulbs when working with cheap plastic beads)

1. Get the supplies
I started by ordering a ton of cheap mardi gras neclaces (the type that have the beads molded on a string) from Etsy, since it was a pain in the butt trying to find enough of them in nice colours anywhere in Finland. I tried to find a hanging planter, as used in the tutorial, but since it's very early spring, there were none in the shops. So I settled for some wire and an Ikea decorative Christmas light. It was a round carton thing with battery operated light string inside, I pried it open and just cut a circular piece of the edge to use as the middle part of the chandelier. I made the top and bottom circles by glueing the leftover slices of the lamp edge together. Make sure you can fit the light bulb part of the cord set through the smaller circle, or add it there already if the circle will be too small.

2. Make the frame
So now I had one large circle (about 40cm in diameter) and two smaller circles (about 9cm and 14cm). I used thin wire to attach them together so that the smaller circle was on top, largest after it and the medium one at the bottom. You should have about double the distance of the medium and largest circle between the medium and the smallest. It's still easy at this point to make the wires shorter or longer. If you want to make your chandelier extra smart looking, paint the base. I didn't and had some issues trying to hide the ugly white frame pieces.

3. Prep the necklaces
 I then cut open every necklace. If you do not need the chandelier to be of a certain size, it's easiest to design it so that one string of beads is long enough to go from the top circle to the bottom circle. This way you don't have to fuse the beads together or do any more cutting.

4. Attach the necklaces to the top of the frame
Start to attach the bead strings to the top circle. Put in as many as you can fit, they can also be on top of each other. The top of the lamp is going to be pretty much hidden when it's in use, so no need to do extra neat job there. It's easiest to work with the chandelier frame when you hang it on to something.

5. Attach the necklaces to the middle of the frame
I just looped the necklaces once around the middle circle edge, so they would cover more of it. You can also just attach them with wire to keep the middle part less bulky.

6. Attach the necklaces to the bottom of the frame
I looped the necklaces around the bottom circle edge and fixed them in place with the thin wire. Some ends were long enough to tie back to the middle circle, so I did that to get it covered better. I let some of the necklace ends hang loose through the bottom loop.

7. Put the cord set in
The light bulb should hang on level with the largest circle. I tied satin ribbon to the top circle and fixed it to the cord with a cable tie. It's not the most elegant of solutions, but it holds well and you can cover it with a bowtie it you want to. It's so close to the ceiling that it doesn't show much anyway. Put the low energy bulb in and attach the lamp to the ceiling. You're done!

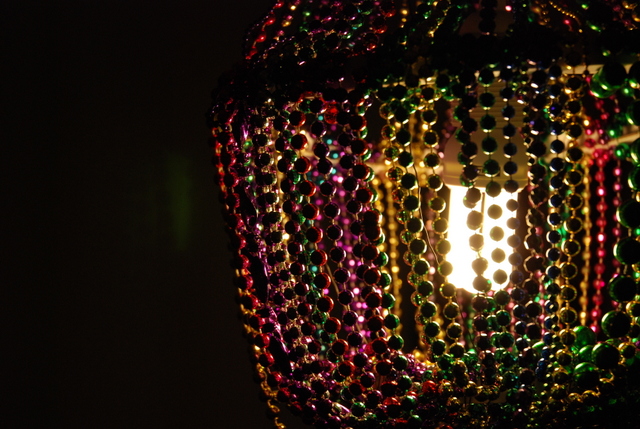
Here's pictures of my chandelier. My boyfriend said it really did look like a dollar store lamp, but I like it anyway ;) He'll get used to it!


You can see my ugly white frame showing through the middle part.

The necklaces are put on pretty carelessly, but this is not the angle from which you look at the finished product.

And the lamp in action! I think it goes well with our purple curtains and bed cover.


Thursday, 1 March 2012

Final Pic from the Shoot!

I got the final picture from the photoshoot I posted about earlier, it looks really nice! Since I'm sick (again! It's so unfair!), it makes for an excellent blog post topic on its own ;)

It's composed of several pictures by Riku from Visual Reality. The final version is not yet in the online portfolio, but there's lots of other nice stuff so go take a peek!

I'm wearing a dress from Artifice Clothing, apron by H&M and Jeffrey Campbell's Litas.


Related Posts Plugin for WordPress, Blogger...