A hair tutorial! I got a pair of Bumpits from a Claire's in Leipzig. They are little plastic things meant to give your hair more volume. For sleek, classic hair dos they might be a bit hard to use, at least with my skills, but they are excellent for the back combed styles I prefer. Basically Bumpits give you a lot more volume with a lot less back combing = a lot less stress on the hair and a lot less hair to untangle the morning after!
There's tons of pictures, but the actual hair do isn't that complicated, I just wanted to cover the whole process in detail. This tutorial shows you how to do a back combed look with curl ends. The style suits mohawks and undercuts with long hair, but you don't need to have any part of your head shaved to do it. Just pin the undercut section close to your scalp or comb all the hair to one side and backcomb that part too.
A big thanks for Nina for taking the pictures :)
 |
| Finished hair do. This one was taken by Niina at Mustalahti in the evening. |
 |
| Stuff needed. |
What you need to achieve this style:
- Hair spray (I only have a spray with strong hold, for best results you should use a light hold spray first and only finish the hairdo with the strong spray)
- Powder texturizer (not obligatory, but gives roots a good boost)
- A pair of Bumpits (the package comes with three pieces, but I've never used the tiniest one)
- Heat protecting spray (only if you want to have curly ends)
- Curling wand, hair straightener, curling tong or any device you like to use for curling hair
- Comb, brush or something else for back combing. I use a Tangle Teezer (partly because it comes in a sparkly purple colourway ;P)
- Bobby pins
- Clip-in streaks in a contrasting colour (optional, but they do make the curls really pop! Make sure you use human hair clips if you plan on curling the ends)
 |
These are the Bumpits I have. See how they have arrow-shaped pins sticking out? That's how they stay in hair so well!
They come in two colours, if I remember correctly, one for light hair and the other for dark. Mine are the dark ones. They are mahogany brown but don't really show when in hair, so it's not too big of a deal if they don't match. |
 |
| My hair before. Please excuse the lack of eyebrows, I do my make-up after my hair :) |
 |
| I washed my hair the same day and dried it. Your hair should not be damp when you start. |
1. If you wish to use clip-in streaks, put them in first. Keep in mind which way you will comb your hair and place the streaks accordingly. I have some tape hair highlight in. Start by combing through your hair and separating a section where you want the poofy part to start. My section is slightly too wide, you should aim for something like 3-4 cm wide section (1-1,5 inches).
I always start with the main hair mass, I do my bangs later, so don't worry about those yet!
2. Apply hair spray lightly to the section to prepare it for back combing. If you have a light hold spray, use it here.
3. Add powder texturizer to the roots and gently rub it in with your fingers to activate.
4. Back comb! Gently slide the comb or brush from the ends toward the roots of the hair. Your aim is to back comb the hair mostly at the roots and leave the ends freely flowing. If you have clip-in highlights or tape highlights like me, just handle them with the natural hair to make them blend in well.
5. When your section is nice and poofy at the roots, grab the smaller Bumpit of the two. Place it right next to the back combed section on the side where you will be combing your hair over. Press it down and nudge gently to make sure the little arrow pins get a good grip.
 |
| Take a Bumpit... |
 |
| Place and nudge... |
 |
| And it stays! |
6. Don't put the back combed section on top of the Bumpit yet, let it hang on the other side for now. Separate another section next to the Bumpit you just placed. This one should be roughly the same size. Your other Bumpit will be placed after this section, so try to find a position where it will lift the hair well.
 |
| The already placed Bumpit hangs on for dear life. |
7. Add some hair spray (light hold) on the section and back comb it like the first one. Then take the larger Bumpit and place it next to the section. You should now have looking from the shaved side (or the side where the hair will be brushed to the other side) a back combed section, then Bumpit, a backcombed section, another Bumpit, and hair falling free.
8. Gently fold your hair on the side you want it to lay on and pat it on top of the Bumpits. Make sure they grip your hair. I feel the Bumpits always feel a little loose, but they do stay on well despite the feeling. They are not supposed to pull your hair but rather just lighty grip it to stay in place.
Use your fingers to spread the hair evenly on the Bumpits and nudge them to make them attach better. If a section looks or feels too flat, just back comb it a bit more.
 |
| Fixing a small section. |
9. After you like how the hair falls on top of the head, smooth the top layer with your brush if you want a sleek look. You should not use a comb, a natural bristle brush or a Tangle Teezer would be best since they don't pull hair so hard and won't snag on the Bumpits.
Have a look at the rest of the hair, if it's lacking volume, back comb gently on the underside to make it look big and still sleek and straight.
10. Time to pin everything in place! Grab your bobby pins and secure any loose sections. My main problem area is in the back, where loose hair likes to stick to the short stubble on my undercut. Pinning the sections on the back of your head higher makes your hair look bigger, since the sections will then rather lay on the side then just down the back.
 |
| Mah pins. And a few safety pins and a pair of earrings, apparently. |
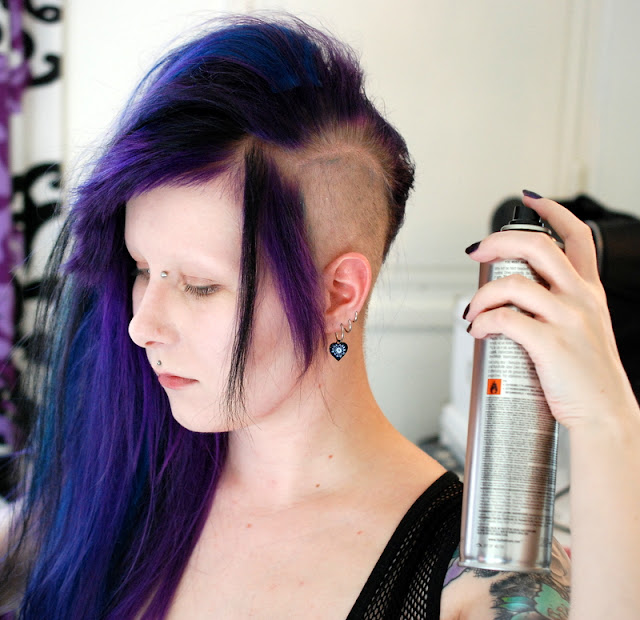
11. Now is the time to get the strong hold hair spray out! Spray your roots liberally and comb the hair with your fingers to make sure it stays poofy. With a strong spray, you can easily style your hair when the spray is drying, just place the hair the way you want and let dry in place.
12. This is the time I usually finish my bangs. I use (my other half's) tiny straightener and hold it at an angle when I pull it through the bangs to give them a curve.
13. Time for curls! I like to add curly ends to this do to make the ends look neater. You can also use a hair straightener to make big waves if small curls are not your thing. First, apply some heat protecting spray on the ends. Then grab your curling thingie (I use a curling wand, I love it!) and curl small sections at a time until all the ends are done.
 |
| For more texture, curl a few sections of the top layers too. |
14. Let the curls cool and brush them open. The curling wand is very effective and I know the curls will stay even when combed, but if you are unsure, add a little bit of hair spray first and let it dry before brushing the curls. If you like the look of defined curls, skip this step!

15. Finish it! The final step when you are happy with how puffy the hair is, how it lays and how the curls look, is to add strong hold hair spray to keep it all in place. My way of applying is to put quite a lot on the roots to keep the back combing intact, very little on the lengths (just a little bit to keep the hair from becoming frizzy) and a light but even coat on the curly ends. The trick with curls is that you need to spray them from below to get the spray into the inner part of the curl as well, a friend taught me this! If your hair doesn't hold curls well, you should try to use the light hold spray on the curls to make sure they don't become heavy and cause the hair to straighten. Less is more when dealing with hard to curl hair and hair spray!
 |
Curls should be sprayed holding the bottle under them and spraying up, to get the
spray inside them. |
All done! My do lasts the whole night nicely (this specific one managed 7 hours of DJ'ing and dancing and an after party, and then I went to sleep) with not added spray. If the hair looks deflated, just tease it with your fingers a bit. Or if you are not as lazy as me, put a comb in your purse for quick fixes.
Here are pictures of my hair from every angle after it's done. I do my hair by myself, or sometimes as my other half to help since there's just so much hair. He's killer at back combing! My hair is thick and there's a lot of it, so thinner hair might need more attention to Bumpit placement and pinning.
And the finished look, with eyebrows and other posh stuff ;D
 |
| This is the same cut and hair do, only on a different day. |


Sun hiukset on aivan ihanan väriset! Ja vähän tuo panta on hieno :D
ReplyDeleteVoi kiitos! Panta on kyllä rouhea, siinä näkyy vielä tarkasti katsoessa nippusiteet joilla näppäräkätisenä kiinnitin kellonviisarit. Ja tietysti meillä oli goottitaloudessa vain mustia nippusiteitä ;D
DeleteThat's so amazing! I love this look, and your tutorial is super helpful. :)
ReplyDeleteSo glad to be of help! :)
DeleteNever heard of bumpits before, they seems great for achieving higher and thicker hair. Must be perfect for me with my thin hair.
ReplyDeleteI think they are quite a new thing, I have seen them only occasionally in shops. You should try them! I believe eBay offers very affordable options :)
DeleteMan, this was helpful! Thanks for this post :) I have shoulder-length hair with undershave and I've been looking for new ways to do my hair.
ReplyDeleteYou are welcome! I hope you post pictures, it would be great to see how it looks on you :)
DeleteI love the clock hand tiara! Been wanting one of those for myself! And that top is very wow! I like the necklace too!
ReplyDeleteI love your hairdo and how you added the little curls at the bottom, too. I am not allowed to use hairspray anymore, since I nearly killed my hair with it for Cobweb Club earlier this year. I have to take care because I am trying to grow it long. I really want to do a ratted out hairdo sometime but my hair is so fine, I think it would all just rip out!
Thank you so much! The tiara was quite easy to make, the hardest part was to find some clock hands in the right sizes, but Etsy is a friend with those kinds of problems!
DeleteYou could maybe try a spray gel or a salt spray for texture? Fine hair needs something to give the back combing a grip. My hair used to be very slick and smooth when it wasn't bleached, the back combing just slid away if I didn't use some product first.
Jumaleisson sun tukka on upee! :O Ihan noissa "ennen" -kuvissakin!
ReplyDeleteEi mullakaan muuten ole kulmakarvoja, kulmakarvat on ihan yliarvostettuja! :D
Kiitos! Kulmakarvat on so last season, paljon enemmän tilaa piirrellä ilman! ;D
DeleteGreat tutorial!!!
ReplyDeleteThanks, I'm glad you liked it!
DeleteAwesome, I've always wonder what to do with those things, I'll have to give them a try. I don't know why "I got them at Claire's in Leipzig" makes me laugh, it just does
ReplyDeleteI think the bumpits are actually meant to be used parallel to your face, but creativity is fun! ;D
DeleteThe hair and finished look is lovely, but I'll be honest-- you look bloody gorgeous without your eyebrows, that's no easy feat hehe. It reminds me of the kind of villain that you just cannot stop adoring for her looks =P
ReplyDeleteI hope that is not an insult to you, because I mean it quite sincerely.
Thanks, I do understand what you mean! I was a bit worried at first about taking pics without brows, but now I'm happy I did it :)
DeleteYou and your hair are so bloody gorgeous and I must say the no-eyebrow look really suits you! I am really quite lazy when it comes to my hair, I rarely do more than straighten it! When my hair was just past shoulder length I curled it all the time, but now that it's reaching the lower portion of my back the curls just never seem to hold! I need a personal hair-dresser on hand I think! ♥
ReplyDeleteI love everything about this post. The pics, tutorial, the hair, the corsets and ohh your gorgeous<3
ReplyDeletesuch a great tutorial! Now I need those bumpits too... as soon as possible :D
ReplyDeleteI love the color of your hair so much <3
This might sound stupid but I love your cleavage on these pics! Where is this dress from? It's goergous! :)
ReplyDelete